Author Archives: Greg

Wall Aquariums and Wall-mounted Aquariums

A couple of innovations in aquariums might be something you wish to consider if you are thinking about getting an aquarium. Wall aquariums are those that are built into a wall and viewed from one or both sides of the wall. Wall-mounted aquariums are hung on the wall like a picture, and do not require aquarium stands. These unique aquariums can be very striking in a room, but are not without their challenges too.

Wall Aquarium
A true wall aquarium is an aquarium that can be variable in length and height, and is the same thickness, or very close to it, as the wall it is in. In most modern construction, interior residential walls are 4.5 inches thick, being framed with 3.5 inch 2 x 4 studs and covered on both sides with ½ inch drywall. You can install a wall aquarium in an existing wall, but it does take some carpentry skills to cut the wall opening, reframe the opening to hold the aquarium, and trim the aquarium on both sides to finish the look. You will also likely want to wire an electrical outlet into the wall opening so you can plug in lights, pumps, and aerators for the aquarium.

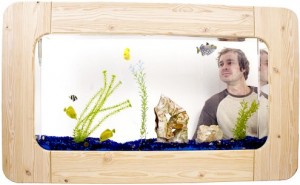
A wall aquarium, showing it being mounted directly in the wall.

A wall aquarium, showing it being mounted directly in the wall.

Access to the aquarium is usually done by lifting the hinged top trim board so you can feed and maintain the tank. However, there is not a lot of room above the tank in which to work.

One problem with both wall aquariums and wall-mounted aquariums is they are thin and have a small surface area of water compared to the volume. This means that the water cannot naturally replenish its oxygen supply easily, and so aerators are highly recommended for the fish.

If you choose to install a wall aquarium, find out if the wall you wish to mount the aquarium in is load-bearing. A load-bearing wall is part of the structural integrity of the building and helps hold up the roof. If you cut into a load-bearing wall and do not replace enough strength back into the wall with framing, you could have a very serious problem, like you roof caving in. If you are at all uncertain about what you are doing it is best to contact a professional.

If you are building a new home or addition it might be best to frame the wall from the start to hold the aquarium. This could save you a lot of hassle later on, but of course you have to plan ahead.

Wall-mounted Aquarium
A wall-mounted aquarium is far less permanent than one framed into the wall itself. This type of aquarium is hung on the wall, like a picture or other piece of art. In fact, many are designed to be living art.

The kits that come with wall-mounted aquariums show you how to mount them, and proper mounting is critical. The tanks are heavy, so the mounting needs to be into wall studs in order to support the weight without falling down. You should know how to locate wall studs before attempting to mount the aquarium.
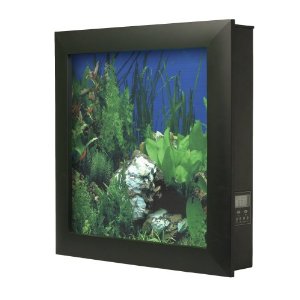
View of a wall-mounted aquarium showing the frame around the front, the background image giving it a detailed look, and the control panel on the side.

View of a wall-mounted aquarium showing the frame around the front, the background image giving it a detailed look, and the control panel on the side.

Stud placement within the wall may not be optimal for your desired placement of the tank, and this is a limitation of a wall-mounted aquarium. Perhaps you should make sure you can mount it where you wish before making the investment, because these aquariums are more expensive than normal aquariums. Also, the mounting brackets that come with the aquariums are designed for studs that are 16 inches on center, which is the most common framing standard in the United States. However, if your home is older, or the wall you wish to mount on for some reason does not have 16 inch on center studs, you may be out of luck.

You will need an electrical supply nearby for this type of tank too. A really clean-looking installation would have the cords hidden in the wall, but most commonly you will need to run the cord down the wall under the tank to the power outlet. It is a good idea to have the cord come down to the floor then loop back up to the power outlet in a “drip loop.” If water should run down the cord it will drip off at the floor and not run down the cord into the power socket—a recipe for a fire.

Room featuring a wall-mounted aquarium.

Room featuring a wall-mounted aquarium.

You will likely want to hide the power cord or disguise it somehow too. You might paint it the same color as the wall, install a cord channel of some sort, or artfully place decorations under the tank to hide the cord. A word of caution, the cord that comes with the tank kit may not be very long, and you may need to replace it or extend it. It is best to let someone who knows about wiring do this work.

Another note about placement, you really should have a minimum of 18 inches free space above the top of the wall-mounted aquarium so you have room to reach into the tank for cleaning.

Wall-mounted aquariums are all-in-one packages with lights, heaters, filters, pumps, aquarium backgrounds, gravel, and aerators already installed and controlled by an on-board computer. As such they remove the guess work from the set up. Also, they are supposed to be low maintenance, but they still require some regular attention. Some people have had issues with finding replacement parts, even for the light bulbs, for example, which might be a real consideration. It might be nice to take it out and plug it in, but something will break, and if you cannot replace the light bulb easily, your wall-mounted piece of art could become an expensive wall-mounted piece of junk.

With both wall aquariums and wall-mounted aquariums there are limitations as to the kinds of fish you can keep. As stated, the tanks are very thin, 4-6 inches. This means that you cannot keep fish that are going to get very large or they will not be able to turn around.

And all the basic information about setting up the tank, balancing the nitrogen cycle, and giving it a good breaking in period, and so on still apply to these tanks. You can find detailed information about setting up an aquarium in other posts.

One of these types of aquariums might be right for you. A wall-mounted kit can give you a very attractive tank without a lot of fuss, but you will pay for it up front as they are more expensive. In an office or home setting, it could be very elegant and a definite conversation piece.

A true wall aquarium likewise would be a great conversation piece, but commits you to significant modification of your home. It might well be worth it, but go into either of these options knowing the pros and cons.

Other aquarium-related posts:
Essential advice for setting up a home aquarium
Aquarium stands, options and considerations
Aquarium hoods
Dinosaurs dragging their bellies—Huh?

Isaac Newton famously wrote in 1676,“If I have seen further it is by standing on the shoulders of Giants.” This gets to the heart of the scientific process—a gradual addition and refinement of human knowledge and understanding of the natural world. But, of course, sometimes even giants had wacky ideas.

The particular “giant” to whom I refer is Charles H. Sternberg, famed fossil collector. Sternberg began collecting fossils when he was seventeen, at a time when it was not exactly commonplace, in about 1867. And he dedicated his life to this unusual pastime, founding a family of fossil collectors when his sons continued the tradition for a second generation. Together, the Sternberg family collected a huge number of fossils for museums and science. There is hardly a major museum in the world that does not have one of their discoveries on display.

Sternberg started his career in the hills of western Kansas, collecting fossil plants from the Dakota Formation. He sent his specimens back to the young Smithsonian Institution, for which he received a letter of acknowledgment that he treasured his whole life. He was bitten by the “fossil bug.”

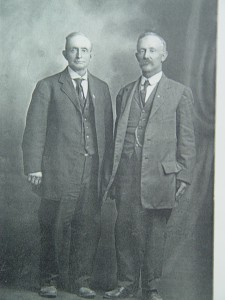
Edward and Charles Sternberg

A rare photograph of Charles Sternberg (right) with his twin brother Edward (left).

By 1875, he enrolled in college where he studied briefly under Benjamin Mudge. Mudge organized a fossil collecting trip for 1876 to collect for O. C. Marsh, the Yale College paleontologist. Sternberg was too late to sign up with Mudge, and bitterly disappointed, and somewhat brazenly, he wrote a letter to Edward D. Cope, Marsh’s rival.

Sternberg wrote, “I put my soul into the letter I wrote him, for this was my last chance. I told him of my love for science, and of my earnest longing to enter the chalk of western Kansas and make a collection of its wonderful fossils, no matter what it might cost me in discomfort and danger. I said, however, that I was too poor to go at my own expense, and asked him to send me three hundred dollars to buy a team of ponies, a wagon, and a camp outfit, and to hire a cook and driver. I sent no recommendations from well-known men as to my honesty or executive ability, mentioning only my work in the Dakota Group.” (Sternberg 1909, pg 33).

Sternberg anxiously awaited a reply, and when he opened Cope’s letter, a draft for $300 fell out, a very significant sum. So began his professional fossil hunting career. Over the years he collected throughout the American and Canadian west. In the twilight of his career he semi-retired to San Diego, and was allowed to use the title of curator at the natural history museum.

Museums and libraries are marvelous places, full of fascinating treasures. It was while reading in the archive at Fort Hays State University’s Forsyth Library that I came across a carefully saved clipping of an article from the  Los Angles Time Sunday Magazine from December 20, 1931, titled “The habits of dinosaurs,” written from an interview with the 80 year old fossil collector.

In the article, Sternberg is quoted as giving his vision of the life of some of the dinosaurs that he had collected over the many years. While I recognize that it is not really fair to judge the views of earlier experts, especially with the perspective of almost three quarters of a century of additional knowledge, but it can be damn funny.

Sternberg is quoted as authoritatively saying, “Dinosaurs were lizards. They stood and walked like lizards, not like elephants or rhinos. That is to say, the normal positions of their feet were outside the line of the body, just like the alligators of today, not inside or even with the line of the body, as are the feet of horses, elephants and other mammals. Moreover, the dinosaur, instead of standing up, on straight legs, as usually pictured, bent its legs outward, as do the lizards, and dragged it belly on the ground, again like the alligators, monitors and other large lizards of the present day.”

Dinosaur reconstructions of that period typically showed dinosaurs with spindly, lizard-like limbs, and tails dragging, but with a generally upright posture. Sternberg evidently did not agree, arguing in favor of his views with some odd reasoning.

Citing fossils of preserved dinosaur skin, he said, “Furthermore, the skin on the lower side of the abdomen of this dinosaur was much thinner and more delicate than on other parts of the body. This is further and strong argument for my claim that the dinosaur dragged its belly on the ground, as do the alligators of today, which so protect their vital parts from carnivorous animals…you may be sure that no tender-stomached dinosaur, whether it weighed forty tons or forty pounds, would voluntarily expose its tenderest and most vital parts to attacks by the tyrant dinosaur or any other carnivorous creature by walking erect.”

Illustration from Los Angles Times Sunday Magazine, 1931

Illustration from Los Angles Times Sunday Magazine showing Sternberg's idea of dinosaur stance.

I totally agree. I hate walking around with my “tenderest” parts exposed. The accompanying illustration of Sternberg’s vision of the Mesozoic is hilarious, with giant sauropod (long-necked) dinosaurs hunkered down, presumably guarding soft spots. I am not really sure how Sternberg expected it would work for a forty ton animal to push itself along the ground with its legs sprawled out to the side, much less how it would support its own weight on its chest, but details, details.

Even though the article claims that Sternberg was a “man of facts and not fancies,” he was prone to exuberant musing about the prehistoric beasts he collected. While he could be wacky, we owe a great debt to the entire family for their contributions to science.

Further reading about the Sternberg family:

Everhart, M. Oceans of Kansas website, summary of the work of Charles H. Sternberg.

Everhart, M. J. 2005. Oceans of Kansas: A Natural History of the Western Interior Sea. Indiana University Press, Bloomington.

Liggett, G. A. 2001. Dinosaurus to Dung Beetles: Expeditions Through Time, Guide to the Sternberg Museum of Natural History. Sternberg Museum of Natural History, Hays, Kansas.

Rogers, K. 1991. The Sternberg Fossil Hunters: A Dinosaur Dynasty. Mountain Press Publishing Company, Missoula, Montana.

Sternberg, C. H. 1909. The Life of a Fossil Hunter.

Other interesting dinosaur facts are found here at Boneblogger. Search or select the category for more.

Sternberg, C. H. 1917. Hunting Dinosaurs in the Bad Lands of the Red Deer River Alberta, Canada. Charles H. Sternberg, San Diego.

How big was the Giant Short-faced Bear?

The character of living things on land changed forever after the Cretaceous-Tertiary extinctions, 65 million years ago. The dinosaurs on land and the marine reptiles in the oceans went extinct, leaving way for mammals and birds to evolve into those niches once held by the “terrible lizards” (dinosaurs) and other giant reptiles.

Throughout the Cenozoic, sometimes “mammal-centrically” referred to as the Age of Mammals, these warm-blooded, fur-covered creatures diversified into a wide range of beasts, including humans. While many of the land mammals got very large, they never matched the recording-holding dinosaurs for superlative size on land.

The largest animals ever known to have lived actually evolved after the dinosaurs and are in fact alive today. An ancient lineage of mammals returned to the oceans and evolved into the modern whales. (See the note about the largest animals feeding upon the smallest).

People are always excited about the Carnivores, or meat-eating mammals. There is something about the dangerous and frightening that excites our primitive nerve centers, so the carnivores are among the most popular at the zoo. (Technical note here—the word carnivore is used in two ways. Carnivore (with a capital “C”) can refer to the class of mammals, the Carnivora, most of whom, but not all, are carnivores (with a lower case “c”), meaning they eat meat. So, not all carnivores are Carnivores, and not all Carnivores are carnivores. Got it? Good.) (Also, see the series on Dangerous Animals for additional exciting facts.)

For example, I recall a visit to the Cincinnati Zoo, and while watching the famed white tigers my young daughter was thrilled when one watched her intently and kept pace with her on the ground while she ran giggling high above on the wooden walkway. She thought that it was a special treat to have one of these magnificent animals take a special interest in her. She felt less special when we mentioned to her that the tiger may not have had cuddling on its mind.

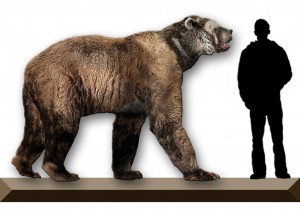
Elsewhere (see related posts below) we have discussed the Giant Short-faced bear (GSFB), Arctodus simus, the great bear from the Ice Age that lived across North America. The GSFB is the largest mammalian Carnivore known, but just how big was it?

Recreation of the Giant Short-faced bear showing its size next to a human

Recreation of the Giant Short-faced bear showing its size next to a human

Many people have examined this question, and one study lays it out clearly (Christiansen 1999). Christiansen examined both the GSFB and its European cousin, the Cave Bear (Ursus spelaeus), another bear famous for its dimensions. Several skeletal measurements have been shown to correlate to overall body mass in mammals. It makes sense that large species have bones of greater relative diameter than small species, and the relationship is more or less linear. By making these measurements a very good estimate of body mass can be made for extinct mammals.

Christiansen used many skeletal measurements of modern carnivores with known body mass to create his linear equations and then plugged in both species of bears to see what the formulas suggested. The results of this study are clear—the GSFB far outweighed any of the modern bears and the cave bear.

These data suggested that a typical (average) GSFB would have weighed in at about 1,700 pounds. Given that there are exceptional individuals, it is estimated that a really large specimen could easily have weighed more than 2,200 pounds. In contrast, the cave bear seems to have a mean body mass of about 1,000 pounds, with exceptional individuals approaching the average for the GSFB.

To further help put this in context, below is a list of select modern and extinct animals and their average body masses. I threw in a couple of dinosaurs for good measure:

Animal

Body Mass (pounds)

Blue Whale

396,830

Brachiosaurus (extinct)

62,300

T. rex (extinct)

14,600

Giant Short-Faced Bear (extinct)

1,700

Kodiak Bear

1,090

North American Lion (extinct)

1,000

Cave Bear (extinct)

1,000

Polar Bear

900

African Lion

375

Indian Tiger

320

American Black Bear

230

Human

160

Leopard

115

Puma

100

Velociraptor (extinct)

98

Cheetah

86

Gray Wolf

78

Wolverine

27

Red Fox

12

No matter how you look at it, “Giant” is a good name for Arctodus!

Christiansen, P. 1999. What size were Arctodus simus and Ursus spelaeus (Carnivora: Ursidae)? Ann. Zool. Fennici 36(93-102).

Related posts:

GSFB, a Northern California Original

Denning behavior in the GSFB

What should you look for in a hunting knife?

Selecting the right hunting knife from the beginning will save you money, and likely some frustration. Spend a bit of time to learn about your options and select the features that are likely to best suit your needs before you buy one.

You should first ask yourself a number of questions. Like, what type of hunting will you do? Are you after moose or squirrels? Do you hunt game birds, or are you after white-tail deer and bear? Are you interested in cutting up game for meat or do you want to bag specimens for mounting?

Clearly, different sized and shaped knives will suite different needs better, and there is nothing worse than trying to gut or skin an animal with a knife that is out of proportion for the job. Using your Bowie knife to gut a squirrel is overkill to say the least, and skinning a bear with a short-bladed folding pocket knife is an exercise in frustration.

How often are you going to use the knife? Will you carry the knife when you are not hunting? Thinking about some of these issues up front will really help you in the end.

If you are going to be doing a lot of hunting, or want a strong knife, you most likely want to get a fixed-blade knife. This is the sort you keep in a sheath. The blade is fixed with the handle and it does not fold for storage. These knives are strong as the blade and handle are usually one continuous piece of steel with some material around the handle end for comfort. Being one piece, these knives can take more torque and abuse than a folding knife. With a folding knife, the blade is hinged to fold, and the pivot point is an inherent weak spot for the knife.

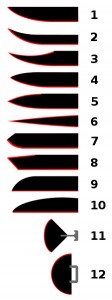
Many styles of blade shapes are available.

Many different blade shapes are available in hunting and pocket knives.

There are many styles of blade shape too. The ends can be gently or dramatically curved, with the point of the knife more or less defined. A knife with a rounded tip is often better for skinning as it is less likely to stab through the hide or meat. Dedicated skinning knives have short, blunt blades with a sweeping cutting edge. They are not very long, so you can control the tip of the knife well.

Some hunting knives have a gut hook. This is a notch on the backside of the blade designed to puncture skin and make a shallow cut. When you are working to eviscerating an animal you want to avoid cutting into the gut contents and having that spill out over your meat. The gut hook helps prevent you from accidentally doing this by cutting just through the skin and muscle layer of the abdominal cavity, allowing you to remove the guts cleanly. This feature might be worth it to you if you are gutting larger animals like deer.

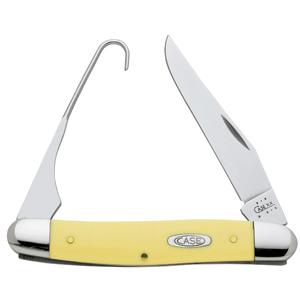
Pocket knife with a bird hook

Pocket knife with a bird hook.

If you hunt upland birds, like pheasants, you might want to consider a bird hook. The hook is used to insert into the body cavity, swirl it around, and pull out all the viscera in one smooth action.

Remember, you do not have to spend a lot of money on a knife for it to suite your needs well. Even utility knives from the hardware store can be very serviceable in the field, cutting and preparing game. I would also recommend that you not get a knife that is too large. Avoid the “Crocodile Dundee” temptation of getting a huge knife—you don’t really want to carry that heavy thing around and it is too big for most tasks anyway.

Handle material is often a personal choice. You can get wood, leather, bone, antler, and various plastics on your knife. Some people really like the natural look, but for utility and strength, plastic is a good choice. It is strong and easy to clean. You can soak it to get blood and other “junk” off of it, and not worry about it being damaged in the water. Plus, it may be less likely to pick up “gamy” smells from use.

There are many considerations and I hope this helps you to think about them before you sink a lot of money into this useful tool.

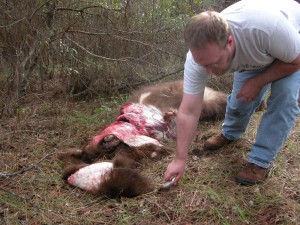
Skinning a Black Bear

Skinning a road-kill Black Bear to recover its pelt and skeletal elements.

Mapping the Pratt Mammoth excavation using GPS and basic surveying technology

The discovery of a partial mammoth skeleton in 1999, and its subsequent excavation in 2000, provided an opportunity to implement several innovations in the on-site mapping of the excavation and relating the excavation to real-world coordinate systems. What follows is a basic primer on what we did.

The mammoth specimen was found during the excavation of a waste-water lagoon on property owned by the City of Pratt, Kansas being leased to Pratt Feeders. While digging the lagoon the heavy equipment operator encountered a hard lens of sediment. Upon digging into it, several large bones were found. News of the discovery found its way to a reporter at the Pratt newspaper, who subsequently contacted me, then at the Sternberg Museum of Natural History. A small group from the museum traveled to Pratt for an initial investigation of the site. After an afternoon of excavating around the exposed bones it became clear that the site was more extensive and a longer excavation was needed. We planned to return to the site several weeks later.

A four-day excavation was planned with numerous volunteers and we returned to the site in November, 1999. After this exploration it again was clear that a longer period of time was needed to fully investigate the site, as we kept finding more and more fossil bone. We re-covered the site once again, and planned to return in the summer of 2000.

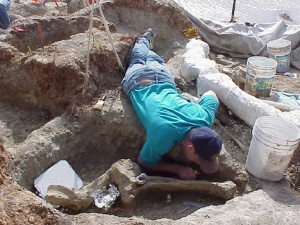
A volunteer excavates around a mammoth vertebra at the Pratt Mammoth site.

A volunteer excavates around a mammoth vertebra at the Pratt Mammoth site.

Because we had time to plan a larger excavation for the summer, and it was clear that there were many bone elements preserved, I wanted to be sure to map the site in detail, both for its paleontological resources, but also for other physical characteristics. So, I arranged to have a surveying total station on hand for the dig. We also lined up numerous volunteers, arranged a university class to be taught using the site as a learning tool, and obtained numerous donations from the generous community of Pratt. The entire community got behind the excitement of the dig, and because the site was easily accessible being at the airport, we hosted numerous visitors.

Establishment of points within the site

During the November, 1999 dig, I had established three control monuments at the site. The monuments were a hub (2 inch x 2 inch stake) and tack (a special surveying nail) driven into the ground away from the areas we were going to be disturbing in our excavations. This insured that we could re-find the control monuments and they would be used to relate all the points of the excavation to each other within the dig area.

Using the control monuments, we established an arbitrarily-oriented meter grid system. I was not concerned with the cardinal orientation of the grid so much as wanting the grid to be useful for in-site control of the dig. One of the principle uses of the grid was to demarcate 2 x 2 meter spaces to assign to volunteers to control their digging efforts. Having the grid on the ground helped to keep their efforts orderly, as they could be assigned to “dig here” and not be on top of each other. The use of the surveying total station allowed for accurate layout of the grid system across the entire site, and allowed for unlimited expansion of the system as needed.
 
The reason that the grid was redundant for the within-site location of bones is that all bones were located with the total station using standard radial surveying techniques. Every element removed from the site was given a field number, and the location of the element was documented in three-dimensions. Initially, the grid system was assigned assumed x and y coordinates in meters, and an assumed elevation was assigned to the control monuments so that the z dimension could be calculated relative to other points in the site.

The total station is set up over a point and aliened with another control point to get a starting line. The instrument can accurately measure distances by shooting a laser to a reflecting prism and measuring the time it takes to return to the instrument. It also accurately measures horizontal and vertical angles. With the vertical angle and the distance, it can calculate the difference in height (z) between the reflector and the instrument. So, with relatively simple calculations the x, y, and z coordinates of any point within the site can be determined. The instrument is highly accurate (within 1/1000’s of a meter in distance) so within-site accuracy is estimated to be high, likely within a centimeter or two given the reliability of using inexperienced volunteers to help with the surveying.

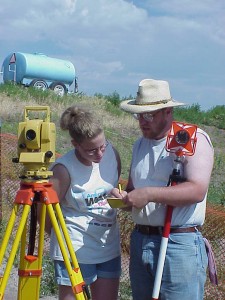
Teaching a young volunteer to use the total station surveying instrument.

Teaching a young volunteer to use the total station surveying instrument.

Most of the elements removed from the site were located with a minimum of two points. The smallest bone fragments were located with point locations of a single measurement. If they bone had any linearity to it, it was located as two points (end and end) giving both the approximate length of the bone and its linear orientation. Several of the larger bones were located with three or more points.

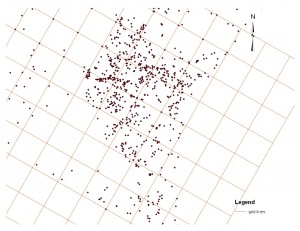
All of the points located at the site are described as their three dimensional coordinates, and therefore can be plotted for visualization.

Point cloud from the Pratt Mammoth site shown in map view with the meter grid.

Point cloud from the Pratt Mammoth site shown in map view with the meter grid.

View the point cloud in a short animation.

Translation and rotation to real-world coordinate systems

During the excavation we used assumed coordinates and elevations. However, it is desirable to be able to locate the site, and all the points located within the site, in a real-world coordinate system so that it can be related to other localities anywhere in the world. We did not have high-precision global positioning system (GPS) equipment available, although such equipment does exist. However, using the following method we were able to get very effective results using a basic Garmin handheld GPS unit.

The accuracy of the handheld unit varies with availability of satellites, access to the open sky, variations in atmospheric conditions, basic limitations of the unit itself, and other variables. However, it is possible to locate a point on the globe to within approximately 15 feet or so. I used the GPS to record the location of two of my control monuments. I used the coordinates of the GPS reading to calculate the azimuth between the control monuments, and assumed that was the true azimuth. I knew the distance between the monuments based upon my field survey of measuring between them. I assumed the GPS reading on one of the control monuments to be true and “held” its coordinates to that reading. Using the azimuth to the other monument from the GPS reading, and the distance measured in the field, I then calculated the new coordinates for the second control monument.

With the assumption of the coordinates of the first monument, the accurate real-world azimuth, and the measured distance to the second control monument providing its coordinates, it was possible to recalculate the coordinates of every point within the dig site. It is a basic mathematic routine to translate (move points horizontally in space) and rotate (turn the points on an axis in space) all the points located at the dig site to a very close approximation of their real-world coordinates. Since we measured all the points in meters I used the Universe Transverse Mercator (UTM) coordinate system. I estimate that the accuracy of these coordinates should be within about 15 feet (the error of the reading on the handheld GPS). This is not as accurate as you could get with high-precision equipment, but it is accurate enough for almost all purposes, and can be achieved with inexpensive equipment that is readily available.

I have modified the system somewhat, but I have since used this basic system at other excavation sites with very good results. The real-world coordinates of every point from the site allows very accurate plotting of fossil sites, and even individual bone elements, in relation to other sites. It also allows for the application of geographic information systems (GIS) technology on the sites.

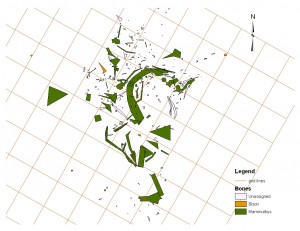
Bones drawn using the points located at the Pratt Mammoth site.

Bones drawn using the points located at the Pratt Mammoth site.