Category Archives: Equipment

Aquarium Backgrounds Explored

So, you are looking at setting up an aquarium. Perhaps you have already looked over the essential advice page, and now want to look at aquarium backgrounds. How can you add some pizzazz to your set up, really making it attractive? A simple, or complex, background can give the aquarium a more finished look.

A really simple aquarium background can be made from an attractive piece of cloth attached to the back of the tank. This will help hide the tubes and wires that come off the tank. Cloth is simple and inexpensive. You can get unusual printed patterns, even mimicking natural textures, or go wild with colorful designs. Being inexpensive, you can change the background easily from time to time, and keep things fresh.

If you want something that looks a bit more finished consider a pre-printed adhesive background. There is a wide variety of images you can select from, including solid colors, reef scenes, and even cartoon characters like Sponge Bob. Sometimes you get a two for one deal with a printed image on both sides that you can reverse out. For example, one side might be a tropic reef scene, and the other might be a land scene for a terrarium, like this one offered by Amazon.

Finally, for a full three-dimensional background that gives true depth and interest to your aquarium, you could by pre-fabricated backdrops made out of Styrofoam. These are really only suitable for large fish tanks, but they really give your display that museum or professional aquarium look. You can get natural looking rock walls, Amazon tree roots, and individual rocks to make your own patterns. Overhangs in the water, caves, and crevasses provide a lot of depth as well as places for the fish in your tank to hide. However, these pre-made backgrounds are not inexpensive, generally starting at $200 and quickly going up in price.

Make your own background

There is another alternative if you are on a budget but are a bit handy, and that is to make your own aquarium background. It is not as hard as it might seem. A materials list is below.

How do museums and zoos get realistic looking rocks in their displays? This same way, and you can do it too. Start with a basic plan for your aquarium set up. Consider up front where you will put hoses, pumps, and heaters so you can leave room in your design. If you have some really interesting tree branches, you may want to incorporate that into the design. Be creative.

With the design thought about, get several sheets of thick Styrofoam from your local hardware store. Cut the foam to fit the back of the tank, and then layer several pieces, like blocks, to the background to create depth and basic texture. The pieces can be stuck together with a bit of silicone caulk. Be creative in giving texture, create overhangs and ledges. Think about the basic shapes of natural stone outcrops you have seen and mimic them. You may want to make sure the bottom of the design is wide enough that the final background is stable. This first step is just your basic landform so don’t worry too much about the details yet.

After you have a rough form, begin to shape the Styrofoam to remove the edges and give it a natural look. Gently brush it with a steel wire brush to rough it up, giving it a pitted surface all over. Use a hair dryer on the foam to melt it into different shapes, but do be careful that you do not catch it on fire. Your goal is to give it a weathered shape.

Next, you will create a firm surface over your basic form. Use ready mix Quickrete from your local hardware store, mix it up and cover your form. The concrete adds to the rock look. You can use a paint brush to dab texture into the concrete as well. You will want a relatively smooth surface, but some shallow texture is good.

Let the cement cure fully, a day or two is best. Now, it is time to add color. Use paints in earth tones, or whatever you like. Make sure you use 100% latex paint. This is so the paint has fewer chemicals that might later leach into the water and harm the fish. Remember, this is not like painting a wall in your house. It is more like layering on color to give it complexity and depth. First, give the surface a basic coat, often one of the darker colors in your palette. Then, dab on lighter colors in varying patterns to add interest. Try the tips of a paint brush, a sponge, a paper towel with paint, a rag—anything you can think of, just have fun.

Let your paint cure fully, again at least a couple of days. The last step is to seal the whole thing with an epoxy resin to seal in the paint and protect it from water corrosion. Epoxy is a two-part material with a resin and a hardener. They are mixed in order to create a chemical reaction which hardens the material. A word of caution—be sure to measure the amounts of resin and hardener and follow the directions for the ratios, AND be sure to really mix the hardener into the resin before applying. The biggest source of failure for the epoxy to set up is the incorrect amount of hardener or it not being mixed evenly. It will result in your epoxy hardening in spotty patches, and some areas might not cure at all.

Give the painted concrete side a detailed covering of epoxy. Be sure to get under your ledges and in caves. Let it set up for several days. Now you are ready to put it in your aquarium. You can use silicon to tack it back to the wall, then seal around the edges with silicone caulk. It helps keep water from getting behind your rock formation.

Fill your aquarium after the caulk has fully set and circulate the water for about three days. Do a complete water change and allow it to circulate several more times. This is to help wash out any toxins that are in the paints and epoxies before you set up with fish and plants.

Now, finally, you have your own custom aquarium background. It was a bit of time, but overall should not cost your too much, and you did it yourself! Much better than something you buy.

Materials list:
Several Styrofoam sheets for base, maybe of various thicknesses
Silicone caulk
Wire brushes
Hair dryer
Knives and other tools for shaping
Ready mix Quickrete
Paint, 100% latex in a variety of colors (3-4)
Brushes, sponges, rags, paper towels, for painting
Epoxy for sealing the surface

Other posts:
Aquarium stands, options and considerations
Wall aquariums and wall-mounted aquariums
Aquarium hoods
Aquarium Stands, What Are the Options and Considerations?

So, you have decided to set up a home aquarium. But there is so much to consider before “diving” in. You can find many suggestions at the essential advice page. Here, we are going to focus on your aquarium stand.

When you first start out, you may only have a small aquarium that you set on some pre-existing piece of furniture. This can work fine, but there are several cautions. Aquaria need a lot of supporting equipment, such as fish food, nets, testing kits, and such. And there can be a lot of hoses and wires running to the tank for filters, heaters, and lights. It is not long before you might wish for a system to contain all this stuff. Not to mention, there are always little bits of water that splash out of the tank, say when filling it or cleaning, and you do not want that water getting on nice furniture. It can easily get under the tank and cause a lot of damage while going unnoticed.

The cure for this is a dedicated aquarium stand. There are several common styles you can buy, and like many other things, the nicer they are the more expensive they tend to be.

Regardless of which stand you end of going with, keep a couple of things in mind. First, the stand should be set up level. If the stand is off level, the water in the tank will sit unevenly in the aquarium. Aside from maybe looking a bit funny, the uneven water pressure could cause your tank to crack and break. Secondly, remember that when your tank is full of water it will be very heavy. Water weighs from 8 to 8.5 pounds per gallon, which means a large 55 gallon aquarium can weigh in at 470 pounds. Plus, you then add fish, pumps, rocks or aquarium gravel, and you soon have a very heavy house-hold component.

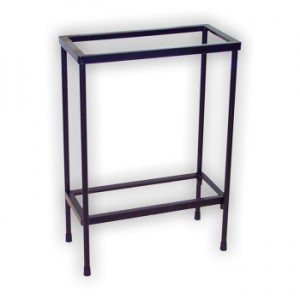
The most basic stand is a simple welded iron affair, often made out of painted angle iron. They tend to be the least expensive style, are sturdy and very functional. However, they are not particularly attractive. Prices range from $20 – $60 depending upon the size. You could drape this stand with a material cover to make it a bit more attractive.

Basic metal aquarium stand

Basic metal aquarium stand.

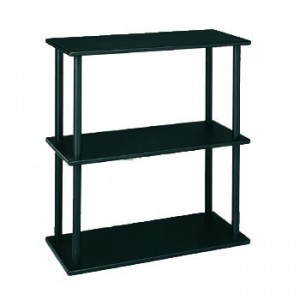
You can buy special open shelving systems designed for aquaria. Usually, the top shelf is sized correctly for the size of aquarium you have, and there are open shelves below to store your equipment. This style of stand is less “industrial” looking than a simple welded stand. They range in price from about $60 – $150.

Open shelving style aquarium stand

Open shelving style aquarium stand

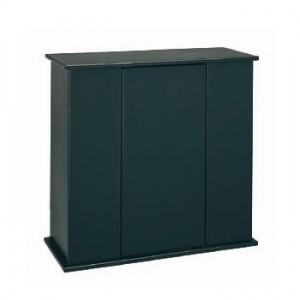
Moving up the “niceness” scale would be a closed cabinet, made out of compressed fiber board and often powder coated to make it more water resistant. This style is really just an enclosed version of the open shelf style, but it can be nice to close the doors on the equipment and supplies stored on the shelving. Prices generally start around $120 for this type.

Fiber board cabinet-style aquarium stand

Fiber board cabinet-style aquarium stand.

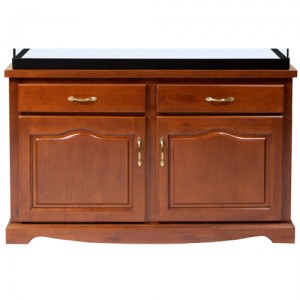
Like any kind of cabinetry, you can get really nice cabinets made out of hard wood and finished with a nice finish. Understandably, the price is much higher, but they look really nice too. You can often get a matching top as well, that sits over the top of the tank and covers the hood and light system, giving a neat, finished look. These nicer cabinets start at $200 and go up from there depending upon size.

Nice wooden cabinet aquarium stand

Nice wooden cabinet aquarium stand.

You could consider making your own aquarium stand if you have any carpentry skills. A simple closed cabinet style with simple doors would not be hard to make. Just remember to frame it with plenty of vertical supports to hold the tank weight, at least one support in front and back for every 24 inches of aquarium length. Also, use at least a ¾ inch plywood for the top.

A nice aquarium stand is a critical part of your aquarium set up, so give it some forethought, and get the best system you can.

Related Posts:
Aquarium hoods
Essential advice for starting a home aquarium
Aquarium backgrounds explored

Camping and Food Safety

One of the most enjoyable things about camping is getting to enjoy the great food that can be prepared over a campfire. Many people also use their portable grills to supplement their cooking methods and there’s nothing like the taste of a juicy BBQ in the middle of the woods. But cooking while camping is definitely not like cooking in your home kitchen and as such, there are extra precautions you have to keep in mind to keep your food safe.

Your most essential piece of camping gear when it comes to food safety will be your cooler. You want to have a nice big one that you can use to store all your uncooked meats. Also think about bringing a smaller cooler just for drinks so that you don’t have to constantly open and close the lid of the larger cooler. Any meat you have should be firmly wrapped and packed tightly with lots of ice. Remember that block ice is generally better for camping than ice shavings, so use that if you can. You can also freeze certain things like prepared soups or stews ahead of time and these will also help to keep your cooler properly refrigerated. And if something has thawed you should cook it right away since there is no way to refreeze it properly without risk of germs developing.

Always make sure to cook your food properly as its better to over-cook something than to undercook. The wilderness is not the place you want to get food poisoning so keep a constant eye on your food to make sure it hasn’t gone bad. Camping tents are the perfect place to keep your cooler if you have set up in shade, so use your shelter for storage when appropriate. When in doubt, you should never eat anything that looks or smells suspect, so always bring an array of canned foods in case your meats go bad. Never sacrifice safety for hunger, and if you prepare properly by bringing adequate supplies, you won’t have to.

Benefits to Owning Tent Trailers

Everybody can use a much needed vacation whether it is to get away from the routines of life or the stress of work.  Unfortunately, vacations can put more stress on us because of the amount it costs to take them!  For many it just isn’t reasonable to go on a vacation every month or weekend.  The costs of hotels and airfare aren’t budget friendly.  Owning a trailer tent can make a weekend trip much more reasonable.

Most of us live pretty close to a wilderness area of some sort whether it’s the beach or the mountains or even the desert.  The possibilities are endless.  On the other hand, not all of us are meant to be serious campers.  We like the comforts our homes and lives offer.  Tent trailers offer a nice compromise.  Although they aren’t made as luxurious or as spacious as a RV they offer a nice in between.

First, they are much more affordable than a motorhome or RV.  Some RV’s can be more than a home mortgage.  You can get a tent trailer for a few thousand dollars or less making it much easier to fit into the budget.  Ok, you might be cringing when you think about a few thousand dollars.  The fact is even going on a big vacation once or twice a year can cost close to that but you will be able to enjoy this for many years to come.

Second, they are much smaller.  They are designed to be compact and easy to transport.  Many even are made to be stacked on their sides so you can store them easier when they are at home.
Third, they are a better option than a traditional camping tent especially if you aren’t such an outdoor enthusiast.  Camping with tents is great if you love sleeping on the hard ground and waking up with condensation built up all around you.  While a tent trailer is still just a tent it has a few extra perks along with it.  It is raised up off the ground so you aren’t going to wake up with a rock lodged in your back.  Also, because it’s up higher off the ground you don’t have to worry about accidentally pitching it where all the water runs off when it rains.  You also won’t have to worry about getting a ground covering either.

Lastly, it gives you a great excuse to get away even if it is just for the weekend.  Pack up a bunch of those non perishables you have in the house, grab some clothes and a few basic camping supplies and hook up the tent trailer.  It is that easy. We all could use more excuses to relax and have a little fun.  Enjoying the outdoors is a great way to do so.

Related Posts:
Considerations for the best camping tents

The Insulating Benefits of a Sleeping Bag Liner

As a necessary requirement for any camping activity or outdoor overnight activity, the sleeping bag is very important. When sleeping in the cold outdoors, it is vital that the proper type of bag is purchased. All products provide a rating on the label, so you know how much protection you will have against the cold. For bags that do not provide enough warmth in the cold, there are other options in improving performance, without purchasing another bag. A sleeping bag liner or travel sheet slips inside your bag, to improve its ability to protect you from the cold. Liners can be added or removed to meet the changing requirements from one day to the next or in different locations.  These products typically come with a zipper, which aids in keeping warmth in your bed roll.

One product available is the silk liner, which is desirable because it is soft, yet sturdy. Other products combine Egyptian cotton with silk, for an even more comfortable feel. Silk fabric is a soft and shiny when dry, yet becomes very strong when it gets wet. Woven silk provides insulation properties that are far better than other heavier fabrics. This makes it perfect for use with bedding, particularly in the outdoors. It can greatly improve the comfort level of the sleeping bag and allow the user to get a better night’s rest. Silk used to make consumer products interestingly comes from caterpillars. If you think about how well this creature’s cocoon keeps out chilling temperatures, you can understand the benefits that using silk will provide in keeping you warm.

If the high cost of a silk liner is not in your budget, you can buy a fleece liner as an alternative. Fleece is made of natural animal fibers, typically from the yak or sheep. It keeps animals warm, so it will help keep you warm inside your bedroll as well. Liners made of this fabric can be washed in a machine at home and are available in many bright colors as well. Coleman offers a desirable product which folds into a highly compact roll, which is kept in place with a stretch cord. This can keep you warm in temperatures as low as fifty degrees (F), by itself. This is an indication of just how warm you will be when using this product inside your bag. It is a very thin fabric, but provides quite a bit of warmth.

As weather conditions can change very quickly outdoors and wind chill can make the environment much colder, using a bag liner is the best way to ensure you will stay warm, when such conditions arise. Many have additional handy features, like a carrying pouch or a closable storage pocket. These items are easy to pack and take with your other camping gear.