Category Archives: Equipment

Illinois Pocket Watch History

In a grand building standing on many acres, the Illinois Springfield Watch Company was born. The year was 1869. The man: J.C. Adams. Adams founded the company based on industry and a vision for the future. Springfield was a booming town and Adams, among others felt it was the perfect place for pocket watch manufacturing.

The first company directors included J. T. Stuart, once a partner of Abe Lincoln, a bank president named Williams, a local merchant named Miller and others. The Illinois Springfield Watch Company began production in 1872, however, things were not in full swing until around 1875. They initially produced key-wound watches and later, a line of fine railroad pocket watches as well.

The company reorganized twice, due in part to financial issues. By 1885, they had become the Illinois Watch Company. The company produced many a pocket watch, not all under the Illinois label. They brought us names like Burlington, Santa Fe, Plymouth and Washington, all produced by Illinois but sold by different means and various exclusive retailers.

The last pocket watch in the Illinois tradition was made in 1932. the Hamilton pocket watch company had purchased the Illinois Watch company in 1927, continuing to manufacture true Illinois. However, after 1932, Hamilton was producing watches with the Illinois label that were technically Hamilton pocket watches.

Just because the Illinois pocket watch ceased production in 1932 does not mean a collector can not still find them today. There are many classic Illinois pocket watches in excellent condition available for sale. Antique dealers, pocket watch guide websites and even ebay are great places to find them. As any collector knows, don’t expect them to come cheap, as antiques never do. The purchase price is going to be dependent on the pocket watch condition, model and year of production (age). The most important any collector or buyer should ensure is that the watch they are buying is authentic. Ask for proof. Any reputable pocket watch seller will be more than happy to meet this request.

Wall Aquariums and Wall-mounted Aquariums

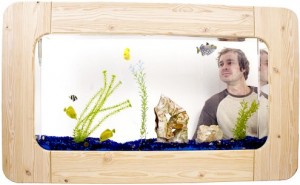
A couple of innovations in aquariums might be something you wish to consider if you are thinking about getting an aquarium. Wall aquariums are those that are built into a wall and viewed from one or both sides of the wall. Wall-mounted aquariums are hung on the wall like a picture, and do not require aquarium stands. These unique aquariums can be very striking in a room, but are not without their challenges too.

Wall Aquarium
A true wall aquarium is an aquarium that can be variable in length and height, and is the same thickness, or very close to it, as the wall it is in. In most modern construction, interior residential walls are 4.5 inches thick, being framed with 3.5 inch 2 x 4 studs and covered on both sides with ½ inch drywall. You can install a wall aquarium in an existing wall, but it does take some carpentry skills to cut the wall opening, reframe the opening to hold the aquarium, and trim the aquarium on both sides to finish the look. You will also likely want to wire an electrical outlet into the wall opening so you can plug in lights, pumps, and aerators for the aquarium.

A wall aquarium, showing it being mounted directly in the wall.

A wall aquarium, showing it being mounted directly in the wall.

Access to the aquarium is usually done by lifting the hinged top trim board so you can feed and maintain the tank. However, there is not a lot of room above the tank in which to work.

One problem with both wall aquariums and wall-mounted aquariums is they are thin and have a small surface area of water compared to the volume. This means that the water cannot naturally replenish its oxygen supply easily, and so aerators are highly recommended for the fish.

If you choose to install a wall aquarium, find out if the wall you wish to mount the aquarium in is load-bearing. A load-bearing wall is part of the structural integrity of the building and helps hold up the roof. If you cut into a load-bearing wall and do not replace enough strength back into the wall with framing, you could have a very serious problem, like you roof caving in. If you are at all uncertain about what you are doing it is best to contact a professional.

If you are building a new home or addition it might be best to frame the wall from the start to hold the aquarium. This could save you a lot of hassle later on, but of course you have to plan ahead.

Wall-mounted Aquarium
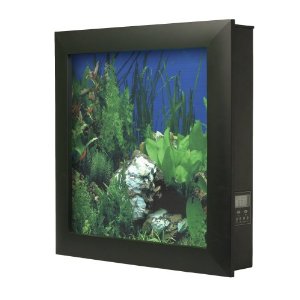
A wall-mounted aquarium is far less permanent than one framed into the wall itself. This type of aquarium is hung on the wall, like a picture or other piece of art. In fact, many are designed to be living art.

The kits that come with wall-mounted aquariums show you how to mount them, and proper mounting is critical. The tanks are heavy, so the mounting needs to be into wall studs in order to support the weight without falling down. You should know how to locate wall studs before attempting to mount the aquarium.

View of a wall-mounted aquarium showing the frame around the front, the background image giving it a detailed look, and the control panel on the side.

View of a wall-mounted aquarium showing the frame around the front, the background image giving it a detailed look, and the control panel on the side.

Stud placement within the wall may not be optimal for your desired placement of the tank, and this is a limitation of a wall-mounted aquarium. Perhaps you should make sure you can mount it where you wish before making the investment, because these aquariums are more expensive than normal aquariums. Also, the mounting brackets that come with the aquariums are designed for studs that are 16 inches on center, which is the most common framing standard in the United States. However, if your home is older, or the wall you wish to mount on for some reason does not have 16 inch on center studs, you may be out of luck.

You will need an electrical supply nearby for this type of tank too. A really clean-looking installation would have the cords hidden in the wall, but most commonly you will need to run the cord down the wall under the tank to the power outlet. It is a good idea to have the cord come down to the floor then loop back up to the power outlet in a “drip loop.” If water should run down the cord it will drip off at the floor and not run down the cord into the power socket—a recipe for a fire.

Room featuring a wall-mounted aquarium.

Room featuring a wall-mounted aquarium.

You will likely want to hide the power cord or disguise it somehow too. You might paint it the same color as the wall, install a cord channel of some sort, or artfully place decorations under the tank to hide the cord. A word of caution, the cord that comes with the tank kit may not be very long, and you may need to replace it or extend it. It is best to let someone who knows about wiring do this work.

Another note about placement, you really should have a minimum of 18 inches free space above the top of the wall-mounted aquarium so you have room to reach into the tank for cleaning.

Wall-mounted aquariums are all-in-one packages with lights, heaters, filters, pumps, aquarium backgrounds, gravel, and aerators already installed and controlled by an on-board computer. As such they remove the guess work from the set up. Also, they are supposed to be low maintenance, but they still require some regular attention. Some people have had issues with finding replacement parts, even for the light bulbs, for example, which might be a real consideration. It might be nice to take it out and plug it in, but something will break, and if you cannot replace the light bulb easily, your wall-mounted piece of art could become an expensive wall-mounted piece of junk.

With both wall aquariums and wall-mounted aquariums there are limitations as to the kinds of fish you can keep. As stated, the tanks are very thin, 4-6 inches. This means that you cannot keep fish that are going to get very large or they will not be able to turn around.

And all the basic information about setting up the tank, balancing the nitrogen cycle, and giving it a good breaking in period, and so on still apply to these tanks. You can find detailed information about setting up an aquarium in other posts.

One of these types of aquariums might be right for you. A wall-mounted kit can give you a very attractive tank without a lot of fuss, but you will pay for it up front as they are more expensive. In an office or home setting, it could be very elegant and a definite conversation piece.

A true wall aquarium likewise would be a great conversation piece, but commits you to significant modification of your home. It might well be worth it, but go into either of these options knowing the pros and cons.

Other aquarium-related posts:
Essential advice for setting up a home aquarium
Aquarium stands, options and considerations
Aquarium hoods

Prepare for Disaster by Packing an Emergency Backpack

You never know when disaster is going to hit close to home.  It’s a simple thing to overlook as we go about our daily lives, but the evidence that things can go terribly wrong on a horribly grand scale is rampant among our world.  Earthquakes, hurricanes, flooding, and wartime struggles are just a few catalysts to force us out of our homes in a moment’s notice and on to the street facing primal survival.  The illustration may sound like hyperbole, but unfortunately, emergency evacuation is something millions of people have to face each year.

Fortunately, you can always prepare for the worst.  If disaster preparedness is themed around immediate evacuation, there are a few things to consider.  First, pack light.  A lot of folks think emergency preparation means going out and buying a pallet of freeze dried food.  That’s great if you’re faced with a disaster that grants you the fortune of staying in your home, but one ton of beef jerky won’t do you much good if you’re forced 100 miles from your neighborhood.  Only pack the things that you need.

Sticking with the packing light theme, pack smart.  Emergency backpacks can surely be loaded with practical tools you may get use out of for years, but what we’re primarily focused on, particularly in reference to perishables (like food and water), are items that will get us through 72 hours – a week at the latest.  Sure, you may very well find yourself in a seriously awful predicament for a much longer period of time, but 72 hours generally allows you get yourself somewhat established and where you need to be to continue.

You’ll also need to pack ahead of time.  This sounds like a no-brainer…it is.  Unfortunately, we as humans tend to put things off until it’s too late.  Going out and purchasing all of the supplies necessary for a good evacuation kit is only half the battle.  If disaster strikes, you don’t want to be running around like a maniac piecing everything together while your house falls apart; you might forget something, or worse, die.  Do yourself a favor, and put your gear together in an easily accessible, memorable location.

As far as the gear itself, we’re keeping it basic.  You need a versatile backpack to stow your supplies, long-lasting, high calorie food, water, first aid, simple tools, a radio, and lightweight shelter.  This guy put together a wonderfully detailed list of all the supplies you need for preparing an emergency backpack.

Remember, pack simple, be smart, and don’t put it off until it’s too late.  Good luck out there!

Forklifts for Sale: Moving Gravel, Rock, & Concrete

What is one of the main common denominators between; concrete, gravel, and rock? The answer to this question is obvious they are all back breaking when they have to be moved.

No matter the project, whether it is; a new retaining wall, instilling a driveway, a decorative gravel walkway, or a rock garden moving the material is always a chore. The material is heavy and often times dirty or dusty. For this reason it is a good idea to have a forklift on hand or know where to find forklifts for sale.

Having the proper equipment to move the material is a must. Most places that you get the material from use many different types of equipment to get it moved. These pieces of equipment can be; forklifts, back hoes, bobcats, and many others.

When someone orders the material from a supplier they usually have it delivered to the project site. When the truck arrives with the material it is usually deposited in one central location. It is then the responsibility of the people performing the work to transport the material to the exact location that it is needed. During this part of business, it is a good idea to have some forklift attachments on hand. If you don’t have the proper equipment, look for forklift attachments for sale.

To do this by hand is next to impossible. Even with the use of a wheelbarrow the person doing the work will soon be sore and tired. This is where the use of proper equipment comes in.

Depending on your application will determine the proper equipment to purchase or rent. Often times a bobcat (or similar equipment) will be the best choice for most smaller jobs. The reason for this is the attachments available for this type of equipment. If you have pallets of stone or concrete block you can use the forklift attachment. If you have to have stone or gravel moved you can use the bucket attachment. Often times when doing a project you will have a combination of materials will be used. The ease of changing the attachments makes this equipment that much more desirable.

Essential advice for starting a home aquarium

My granddaughter came to me yesterday and asked me to get her an aquarium. Before I could make such a promise I wanted to investigate what all was involved in setting up a fish tank.

As part of my investigation I decide that I need to review my knowledge and see what new advances the “experts” could teach me about the care of fish. I took my clip board and set out.

One of my first observations was the change in the sources of tropical fish. Years ago when I was keeping tropical fish there were many places to acquire small pets and fish. There was a time when many variety and dry goods stores, also known as five and dimes, had fish. The small stores have been taken over by today’s larger mini-marts, many of which do not have the personnel to care for live animals.

Today, fish can only be obtained from dedicated pet and pet supply stores. Some of these stores have general pet supplies, and a few specialize in fish and aquaria.

I visited three shops in my local area to get a feel for how knowledgeable the employees are. Two of the stores were general pet supply stores and one emphasized the aquarium. In all the shops the employees were eager to assist me, but of course the employee at the specialty store was much more helpful. The specialty shop not only knew about the fish and the equipment that I would need, she was eager to teach me how to set up a tank so that I would become a successful aquarist. Included in her advice was information about the various fish and how to pick fish that would result in a balanced community tank.

Basic items for a home aquarium:

  • Aquarium
  • Aquarium Stand
  • Hood/Light
  • Filter System
  • Filter Media
  • Aquarium Gravel
  • Heater
  • Thermometer
  • Fish Food
  • Supplemental Food
  • Bio-Boost
  • Gravel Cleaner
  • Books
  • Salts and water conditioner

Before any fish are purchased there should be some thought as to where the fish tank will be placed. The location of the tank will influence the size of tank to buy. Fish tanks can be purchased in 2.5 gallons to 150 gallons and larger. Even larger tanks can be special ordered or full wall aquaria can be installed but large fish tanks are probably not for beginners.

One important fact to consider when setting up an aquarium is the weight of a tank once it is set up. The water, aquarium gravel, aquarium hood, a filtration system, and all the cords necessary to operate the accessories could add up to a lot of weight. A five gallon tank set up can have a total weight of 45 lbs or more.   The home aquarist most often purchases a 55 gallon tank. An estimated weight for a 55 gallon fish tank would be about 500 pounds. Five hundred pounds of glass and water will require a very sturdy stable aquarium stand.

The size of the tank will influence the number of fish you should keep. The usual rule of thumb is one fish per gallon of water. This rule can be stretched in either direction depending on the breed of fish you select, and if you have a large fish tank. The larger the adult fish, the fewer fish per gallon. One of the factors that could have an influence on the number of fish kept in one tank is how frequently the tank will be cleaned. A crowded tank will need to be cleaned and filtered more often to prevent the pH of the water from rising too rapidly.

You can also get fish tanks in shapes other than rectangular. If you want to consider an aquarium of a unique shape be aware of the pros and cons. A multi-sided slender tank can add interest in the final effect of a display and show off the fish in a different way. However, it might complicate the cleaning of the tank as well as add expense for special equipment to set it up and to maintain.

Don’t forget that an electrical outlet should be somewhere near the proposed set up site.  Electrical power will be needed to power the filter, heater, and lights. The aquarium hood keeps the tank covered, which helps keep evaporation of the tank water to a minimum, and it also helps protect the fish from jumping out. Some species have a little too much energy for their own good.
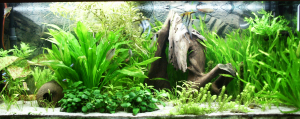
Densely-planted tropical fish tank

Densely-planted tropical fish tank. View larger image to spot the happy fish!

Without a doubt a filtration system is essential. The filtration can be done by mechanical, chemical or biological methods, or a combination of these systems. Get as much information about each system before purchasing any system. Be sure you know what will be involved in cleaning or replacing the filter media.

Other pieces of equipment that you will need are a heater, a thermometer, and perhaps books for general information. Some additional items you might want to consider are chemicals such as aquarium salt—to help cure and prevent diseases; water conditioner—to remove chlorine from tap water; a bio-boost—to start the nitrogen cycle; and vitamins and minerals—to add to the general health of the fish.

Optional but recommended items

In for a penny, in for a pound. Now that you have gotten this far, here is another list of items to consider having:

  • Live Plants
  • Background
  • Rocks
  • Driftwood
  • Fish Net
  • Algae Scrubber
  • Ammonia Test Kit
  • Nitrite Test Kit
  • Nitrate Test Kit
  • pH Test Kit

The plants and decorations add interest and help keep fish healthy, and the testing kits are explained below.

How to set up the aquarium

Even new aquaria and equipment should be well rinsed with warm clean water before it is use. If an aquarium background (See article on aquarium backgrounds) is going to be used, it is easier to be placed on the tank before any water or decorations are added in the tank.

The tank should be placed on a level solid base away from direct sunlight. A sturdy aquarium stand is recommended to hold the weight and help prevent the possibility of a pressure crack.  With the tank resting in place, add rinsed aquarium gravel. (If an under gravel filter is used, place it first.)

Start filling the tank with lukewarm water by slowly pouring the water into the tank in such a way that it slides down a side before hitting the bottom of the tank. The purpose of this is to avoid displacing the gravel, and later the aquarium ornaments and filter. When the tank is ½ to 2/3 full, decorations, plants, and possibly the filtration system can be added. The decorations, plants, driftwood, and that sort of thing, adds interest to the look of the tank, but it also provides cover for the fish to hide in. Being able to hide helps the fish be less stressed, and they will live longer.

Continuing to add water with care will eliminate the need of reaching into the tank and repositioning the placements. When the tank is within 2” of the top add aquarium salt and water conditioner. Be sure to consult the package for directions.

Finish hooking up the filtration system. Place the heater and thermometer into the aquarium. (Follow the direction given with the heater.) Continue filling the aquarium with water to 1” of the top. Turn on the filter and heater, let everything cycle for at least 24 hours. Some adjustment to the heater may be necessary to keep the water at the desired temperature for the fish you intent to add. (Tropical fish 76-78 degrees and gold fish 70-72 degrees.)

After the tank has had the proper time to cycle, it is recommended that you test the water for the desired pH level for the fish you want to keep, and make any adjustments as needed. (Some additional information about pH can be found here). It is now, finally, time to add some fish to your tank.

It is recommended, especially for the beginner, to select fish species for their ability to withstand the nitrogen cycle. Some of the recommended fishes are Barbs, Swordtails, Danios, and some Tetras. A knowledgeable pet shop clerk can assist you in making the right selection. The first fish added to the aquarium will help establish a good nitrogen cycle.

Nitrogen Cycle

Nitrogen is the most common element in the atmosphere, and it is essential to all living things. However, most living things cannot get nitrogen out of the air on their own. The organisms that can, mostly bacteria, are called nitrogen-fixing. The cycle starts in your fish tank with the ammonia stage, when the fish give off urine and solid waste into the water. The ammonia would quickly build up in the water to levels that are toxic to fish. Fortunately, we have some helpers in the bacterial world.

Certain bacteria are able to convert the rising ammonia is nitrite, also toxic. But this product is converted with the help of another bacterium into nitrate. Nitrate is in a form that can be used by aquarium plants as a nitrogen food source. So, what the aquarium-keeper must do is to establish this process in the new tank.

Fortunately, the bacteria you need to grow in your tank are everywhere (in the air, water, etc.), but they need time to grow to suitable population levels in your tank to keep the ammonia levels down. This is why it is best to start with a few hardy fish that can tolerate initial rising ammonia levels till the bacteria really kick in. Testing kits can help you determine when this cycle is set up and in balance. Also, you will likely need to change out some of the tank water from time to time as another method of reducing ammonia levels.

This full process should take about 2 or more months, so do not get the most expensive fish right away. You may have some early casualties. With the nitrogen cycle established and the starter fish thriving it is time to add more fish to the tank. The size of the tank will determine the final number of fish. With the final number in mind a mixture if live bearers, schooling fish, catfish and algae eaters can be introduced into the community.

Adding varieties of fish serves more than just adding more fish to the tank. Variety adds to the interest of a tank and each variety can contribute to the health of the tank. As an example the catfish, one for every 5 gallons of water, are bottom feeders and will help consume the food that has fallen to the bottom of the tank. This in turn helps prevent the food from rotting and fouling the waters. The algae eaters, usually one for every 10 gallons, do just as the name implies. They eat algae and helps keep the algae controlled.

A well established aquarium will naturally do a lot to keep itself healthy. It will produce the bacteria that will help keep the nitrogen cycle active. Plants take up the nitrogen and carbon dioxide and give off oxygen. The fish will do their job of eating the bottom foods and eating algae. An aquarist must do his job of providing the final assist, periodic cleaning, and maintenance. But this rewarding hobby will provide you and your family with hours of enjoyment.

Related Posts:

Snails in an aquarium
Breeding fish in a home aquarium
More about egg laying fish
Live bearing fish in a home aquarium
Aquarium background
Crustaceans and larvae as fish food
Diverse food for aquarium fish
Aquarium gravel and water
Experiences in setting up a home aquarium
Aquarium Stands, what are the options and considerations?
Aquarium hoods
Fishing games—a sea of options