Category Archives: Equipment

Mapping the Pratt Mammoth excavation using GPS and basic surveying technology

The discovery of a partial mammoth skeleton in 1999, and its subsequent excavation in 2000, provided an opportunity to implement several innovations in the on-site mapping of the excavation and relating the excavation to real-world coordinate systems. What follows is a basic primer on what we did.

The mammoth specimen was found during the excavation of a waste-water lagoon on property owned by the City of Pratt, Kansas being leased to Pratt Feeders. While digging the lagoon the heavy equipment operator encountered a hard lens of sediment. Upon digging into it, several large bones were found. News of the discovery found its way to a reporter at the Pratt newspaper, who subsequently contacted me, then at the Sternberg Museum of Natural History. A small group from the museum traveled to Pratt for an initial investigation of the site. After an afternoon of excavating around the exposed bones it became clear that the site was more extensive and a longer excavation was needed. We planned to return to the site several weeks later.

A four-day excavation was planned with numerous volunteers and we returned to the site in November, 1999. After this exploration it again was clear that a longer period of time was needed to fully investigate the site, as we kept finding more and more fossil bone. We re-covered the site once again, and planned to return in the summer of 2000.

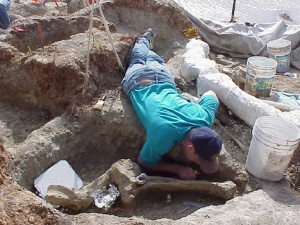
A volunteer excavates around a mammoth vertebra at the Pratt Mammoth site.

A volunteer excavates around a mammoth vertebra at the Pratt Mammoth site.

Because we had time to plan a larger excavation for the summer, and it was clear that there were many bone elements preserved, I wanted to be sure to map the site in detail, both for its paleontological resources, but also for other physical characteristics. So, I arranged to have a surveying total station on hand for the dig. We also lined up numerous volunteers, arranged a university class to be taught using the site as a learning tool, and obtained numerous donations from the generous community of Pratt. The entire community got behind the excitement of the dig, and because the site was easily accessible being at the airport, we hosted numerous visitors.

Establishment of points within the site

During the November, 1999 dig, I had established three control monuments at the site. The monuments were a hub (2 inch x 2 inch stake) and tack (a special surveying nail) driven into the ground away from the areas we were going to be disturbing in our excavations. This insured that we could re-find the control monuments and they would be used to relate all the points of the excavation to each other within the dig area.

Using the control monuments, we established an arbitrarily-oriented meter grid system. I was not concerned with the cardinal orientation of the grid so much as wanting the grid to be useful for in-site control of the dig. One of the principle uses of the grid was to demarcate 2 x 2 meter spaces to assign to volunteers to control their digging efforts. Having the grid on the ground helped to keep their efforts orderly, as they could be assigned to “dig here” and not be on top of each other. The use of the surveying total station allowed for accurate layout of the grid system across the entire site, and allowed for unlimited expansion of the system as needed.
 
The reason that the grid was redundant for the within-site location of bones is that all bones were located with the total station using standard radial surveying techniques. Every element removed from the site was given a field number, and the location of the element was documented in three-dimensions. Initially, the grid system was assigned assumed x and y coordinates in meters, and an assumed elevation was assigned to the control monuments so that the z dimension could be calculated relative to other points in the site.

The total station is set up over a point and aliened with another control point to get a starting line. The instrument can accurately measure distances by shooting a laser to a reflecting prism and measuring the time it takes to return to the instrument. It also accurately measures horizontal and vertical angles. With the vertical angle and the distance, it can calculate the difference in height (z) between the reflector and the instrument. So, with relatively simple calculations the x, y, and z coordinates of any point within the site can be determined. The instrument is highly accurate (within 1/1000’s of a meter in distance) so within-site accuracy is estimated to be high, likely within a centimeter or two given the reliability of using inexperienced volunteers to help with the surveying.

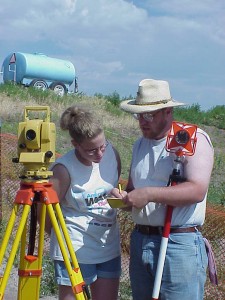
Teaching a young volunteer to use the total station surveying instrument.

Teaching a young volunteer to use the total station surveying instrument.

Most of the elements removed from the site were located with a minimum of two points. The smallest bone fragments were located with point locations of a single measurement. If they bone had any linearity to it, it was located as two points (end and end) giving both the approximate length of the bone and its linear orientation. Several of the larger bones were located with three or more points.

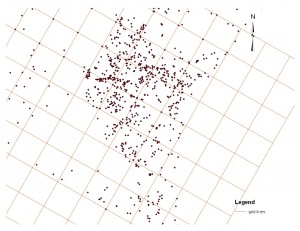
All of the points located at the site are described as their three dimensional coordinates, and therefore can be plotted for visualization.

Point cloud from the Pratt Mammoth site shown in map view with the meter grid.

Point cloud from the Pratt Mammoth site shown in map view with the meter grid.

View the point cloud in a short animation.

Translation and rotation to real-world coordinate systems

During the excavation we used assumed coordinates and elevations. However, it is desirable to be able to locate the site, and all the points located within the site, in a real-world coordinate system so that it can be related to other localities anywhere in the world. We did not have high-precision global positioning system (GPS) equipment available, although such equipment does exist. However, using the following method we were able to get very effective results using a basic Garmin handheld GPS unit.

The accuracy of the handheld unit varies with availability of satellites, access to the open sky, variations in atmospheric conditions, basic limitations of the unit itself, and other variables. However, it is possible to locate a point on the globe to within approximately 15 feet or so. I used the GPS to record the location of two of my control monuments. I used the coordinates of the GPS reading to calculate the azimuth between the control monuments, and assumed that was the true azimuth. I knew the distance between the monuments based upon my field survey of measuring between them. I assumed the GPS reading on one of the control monuments to be true and “held” its coordinates to that reading. Using the azimuth to the other monument from the GPS reading, and the distance measured in the field, I then calculated the new coordinates for the second control monument.

With the assumption of the coordinates of the first monument, the accurate real-world azimuth, and the measured distance to the second control monument providing its coordinates, it was possible to recalculate the coordinates of every point within the dig site. It is a basic mathematic routine to translate (move points horizontally in space) and rotate (turn the points on an axis in space) all the points located at the dig site to a very close approximation of their real-world coordinates. Since we measured all the points in meters I used the Universe Transverse Mercator (UTM) coordinate system. I estimate that the accuracy of these coordinates should be within about 15 feet (the error of the reading on the handheld GPS). This is not as accurate as you could get with high-precision equipment, but it is accurate enough for almost all purposes, and can be achieved with inexpensive equipment that is readily available.

I have modified the system somewhat, but I have since used this basic system at other excavation sites with very good results. The real-world coordinates of every point from the site allows very accurate plotting of fossil sites, and even individual bone elements, in relation to other sites. It also allows for the application of geographic information systems (GIS) technology on the sites.
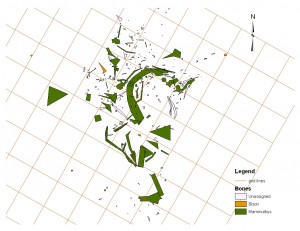
Bones drawn using the points located at the Pratt Mammoth site.

Bones drawn using the points located at the Pratt Mammoth site.

Snails in an aquarium

There was a time when snails were thought to be necessary to have in a home aquarium. The idea was that the snail would clean up the fish droppings and the snail droppings were good for the plants. The plants in turn would give off oxygen that would help keep the fish healthy.

The reality is that the snails don’t eat the fish dropping, and the snail droppings add to the tank debris. Plants can utilize some of the droppings but the rest must be cleaned up by the filtration system. Plants do give off oxygen during the day, but the fish are not dependent upon that oxygen source if you have a good filter that is aerating the water.

The filtration system in the aquarium cleans up the animal matter and provides the necessary aeration to the fish tank. So what do snails do? They clean up excess fish food that would otherwise foul a tank. They help by eating some of the algae that adhere to the tank walls. They eat on the eggs of the fish, breaking them up but not consuming all of the egg before they move on to the next. Snails will also eat on the plants. Most of them usually do not eat the whole plant. They make holes in the plant, weakening them and disturbing the ambiance of the aquarium décor.

There are hundreds of snail species. The most common snails which are most likely to find their way into the aquarium as a stowaway on plants and live food is the Pond Snail. Most of them are prolific breeders. It is necessary to thin the snail population from time to time or they will consume the tank plants. The easiest way to thin the population is to crush them. Many fishes will eat the crushed snails and benefit from the live food.

Some fish breeders raise snails as a source of fish food. Not only will larger fish eat crushed snails, but the snails will help produce infusoria, a collection of tiny single-celled and multi-celled organisms that very small fish can eat. The Apple snails are a common group used to help start infusoria. The snails eat large quantities of plant material, such as lettuce. They produce a large amount digested waste that is a wonderful source of food for infusoria*.

*The use of infusoria was mentioned in an earlier posting.

Related posts:
Aquarium backgrounds
Breeding fish in a home aquarium
Experiences in setting up a home aquarium
Essential advice for starting a home aquarium
Aquarium gravel and water
Aquarium stands, options and considerations
There are many other fun interesting facts here at Boneblogger.

Live bearing fish in a home aquarium

In several other posts we have looked at fish breeding. We learned about fish that scatter their eggs and fish that hide or anchor their eggs. Fish that harbor their young within their bodies are called livebearers. This group of fish sometimes harbors the eggs in the mouth of the parent and sometimes in the abdomen.

There are about 4 species and a couple of sub-species commonly that are used in a fish tank aquarium. Included in this group are Mouth-breeding Betta, Moffat’s, Gunther’s Cichlid, and Black-chinned Mouthbreeders. In this method of spawning, the female drops her eggs and they are fertilized by the male. Then the eggs are picked back up and kept by one of the parent fish in the mouth until they hatch. The mouth of the parent is not only an incubation chamber, but after the young hatch, a place of safety to dash into in case of danger. Watching the young dash for safety can remind one of people rushing into the New York subway during rush hour.

Many more species of common fish tank fish retain the eggs within their abdomen, and include more than 20 species and several subspecies. Some of the more common to a home aquarium are the Guppy, Molly, Swordtail and Platy. Some of these species will inter-breed in captivity. This knowledge has given amateur and professional breeders a field day in producing many variations in colors and bodies that would not occur in nature.

Animals that retain fertilized eggs within their abdomens are called ovoviviparous. Eggs are produced and then fertilized internally by the male as he swims along beside the female, and the fertilized eggs are carried within the abdomen until they hatch. (This is not the same situation as found in mammals. Mammals not only retain the eggs, but set up a nourishment system from the mother to the young through the placenta. Ovoviviparous species simply retain the eggs and do not provide a maternal nutrition source.). Additionally, in some species the female fish can retain sperm cells for many months and as many as 8 broods have been produced from a single insemination.

As a general rule a well-fed mother will not eat her young. This does not say that other fish in a community tank will not feed on the newborns.

Fries can be produced and survive in a community tank. However, if the expansion of your fish population is your goal, a properly setup breeding tank will give you better results.

Related Posts:

Breeding fish in a home aquarium
Crustaceans and larvae as fish food
Fishing games—a sea of options
Fishing as a pastime for you and your family
More about egg-laying fish

Tent purchasing basics

Whether you are a long time experienced camper or a first time adventurer in the wilderness, you will need a good tent if you are going to maximize your camping experience. A lot of people always worry when they purchase tents because there are such a wide variety of products available. All of them seemingly appear to be decent quality since a tent’s appearance can be quite deceiving, but the true test of a tent’s real value is how it functions in the real world. With the wrong choice of tent, a camping experience can spiral into a cold and watery experience where the camper may never want to return to a campground again, but with the right tent, a camping trip can be very memorable and really fun.

When looking around for a tent you will want to think about what type of camper you are in terms of season and the weather. Three season tents will fit most of your camping adventures as long as you don’t venture out into the cold and challenging climate during the winter months. Three season tents will be absolutely perfect for the casual camper or people who are interested only in easy and light camping during the summer. A first time camper will probably want to go with a sturdy dome tent for their strong structure and the ease at which they can be set up. Dome tents are much shorter than larger cabin tents but the trade off comes from minimal effort in setup and also greater protection from the wind.

Other factors to consider are the material the tent is constructed of and how well the tent is ventilated on the sides and top. You will always want a tent that can stand up to the harsh rain with openings that close tightly, but also a tent with easily accessible openings (possibly thin mesh) for when it gets hot. Remember, a tent can be very uncomfortable if it’s cold and rainy but it can be equally as unbearable with the intense hot sun beating down on it and trapping warm air within. Overall, take into account of what type of tent you need whether it is a 4-person tent or a 6-man tent and with the proper preparation and research you will discover a good tent that will compliment your camping needs.

Related Posts:
Considerations for the best camping tents

Choosing a Compound Bow

Guest Post:

Choosing a compound bow for a new enthusiast can be a tough decision. There are a few major things you should consider before deciding on a bow. This article is intended to give you an idea of what to evaluate when choosing a compound bow.

Axle Length
The axle length of a bow is the total length of the bow. If you are new to the sport choosing a longer axle length bow is best. A longer axle length bow is more forgiving for new users. More experienced users will prefer a shorter length due to its ease of maneuverability.

Brace Height
The brace height is the measurement between the bow string and the grip. A lower brace height will allow a new user to get a better aim but will lose speed. The same can be said vice versa for high brace height bows.

Total Bow Weight
You should consider the type of hunting you will engage in before choosing a bow. Heavier bows can become cumbersome on long walks but tend to make less noise when shot. Lighter bows are louder when shot but much easier to carry. If you will be hunting from a tree stand you might choose the heavier bow because you won’t be carrying it for long periods at a time.

Draw Length
You should have a professional at your local bow or sporting goods shop measure your draw length. Most bows have some leeway and can be adjusted to fit the individual.

Cams
Bow cams store power in a bow. Having one cam on your bow is pretty standard. It can make pulling the bow easier and allows the user more power in a shot. One cam bows have come a long way making two cam bows pretty obsolete.

Limbs
Limbs come in two types, split and solid. This is a personal choice for the hunter. Limbs do not affect the bows performance.

If you are new to bow hunting make sure you try out a verity of bows and test their performance. Also try to find a couple of good compound bow reviews. While store associates can be pretty helpful a bow purchase should be based on your own personal feel for the bow.