Tag Archives: handheld GPS

Garmin Montana 650T Review – A Handheld GPS for Adventurers

Last year Garmin introduced three new handheld GPS devices for the Montana range.  There was the new 650T, 650, and 600 all of which come with an extra large 4-inch display and as well as offering voice guidance if you wish to also use it in your car as a standard GPS.  However, its main use is for those adventuring in the great outdoors.  Read on for a review of the Montana 650T detailing the functions that make it a cutting edge outdoor GPS handheld that is perfect for adventurers.

Montana Comes with a Large Touch Screen Display

From the outside the Montana 650T does look a bit like the existing Garmin Oregon product. The Montana’s appearance is dominated by the touch screen display which is large enough to be operated when wearing gloves which is perfect for outdoor use in rugged environments.  There is a button on the right edge of the case which lets you regulate the backlight and volume and the casing is very robust as well as being water resistant with all ports are hidden behind solid rubber caps.

Loads of Memory Storage for New Garmin Maps

There is plenty of storage space for maps with an internal memory of 7.35 GB, of which about 3.2 GB is freed up for user data that you generate whilst using the handheld.  There is also a micro SD memory card slot so you can upload additional GPX files such as way points, tracks, and geo caches.

Use the Virtual Keyboard and Clear Display

The 4-inch resistive touch screen display shows a large virtual keyboard that lets you enter text and shows clearly defined maps.  Comparing the Montana to the Garmin Oregon, this screen is almost double the size and has clearly been designed to be used by people who are going to be battling the elements where visibility could be poor.  The backlight is only used when sun light hits the display at an awkward angle but in most scenarios no additional lighting is necessary. The display is far brighter than in any other outdoor GPS device by Garmin. However, this can lead to a short battery life if you turn the display up to full brightness for extended periods of time.

Interestingly, the antenna appears on the back – next to the camera lens – so in order to record your progress via GPS it is usually best to strap the Montana vertically to your backpack straps so that the antenna has a clear view of the sky. If you carry the Montana horizontally in front of your body then you might not get a great reception which could be an issue whilst in dense forest.

Improved Software Enhancements and Easy to Use Menu

The software shows many improvements compared to the old Garmin Oregon and there are many different configuration options that are accessed using a three-page menu structure.  Each page has easy to understand icons which you can slide between using your finger.

The Garmin Montana offers the same features as the other GPS handhelds from Garmin included paperless geo caching, track and GPS navigation, Topo maps, and more.  To load new maps you can use the following types of cards: City Navigator, BlueChart marine, outdoor topographic maps, satellite images, raster, and OpenStreetMap compatibility – if you wish to buy additional maps for your Montana then you should use a Garmin Discount 2012 coupon to save yourself some money.

Comes with a Digital Camera for Geo Cachers

There is also a digital camera included with the Garmin Montana, letting you take photos as you hike.  It uses a 5 megapixel digital camera – this could be good for geo cachers as they can scan a clever hiding place, or perhaps a geologist who wishes to make an image of a new find.

Conclusion: The Garmin Montana is very similar to existing Garmin GPS handhelds, with the addition of a camera and a larger display.  Whilst this might not be enough for existing users of older models to be persuaded to upgrade, it is a superb handheld for people who do not yet own a device like this.  Prices start around $200 US Dollars although you might want to wait until the new Garmin Fenix watch hits the shelves later in the year before purchasing.

Mapping the Pratt Mammoth excavation using GPS and basic surveying technology

The discovery of a partial mammoth skeleton in 1999, and its subsequent excavation in 2000, provided an opportunity to implement several innovations in the on-site mapping of the excavation and relating the excavation to real-world coordinate systems. What follows is a basic primer on what we did.

The mammoth specimen was found during the excavation of a waste-water lagoon on property owned by the City of Pratt, Kansas being leased to Pratt Feeders. While digging the lagoon the heavy equipment operator encountered a hard lens of sediment. Upon digging into it, several large bones were found. News of the discovery found its way to a reporter at the Pratt newspaper, who subsequently contacted me, then at the Sternberg Museum of Natural History. A small group from the museum traveled to Pratt for an initial investigation of the site. After an afternoon of excavating around the exposed bones it became clear that the site was more extensive and a longer excavation was needed. We planned to return to the site several weeks later.

A four-day excavation was planned with numerous volunteers and we returned to the site in November, 1999. After this exploration it again was clear that a longer period of time was needed to fully investigate the site, as we kept finding more and more fossil bone. We re-covered the site once again, and planned to return in the summer of 2000.
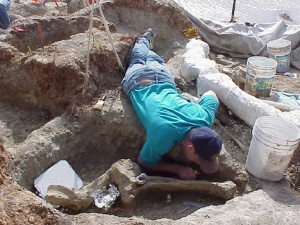
A volunteer excavates around a mammoth vertebra at the Pratt Mammoth site.

A volunteer excavates around a mammoth vertebra at the Pratt Mammoth site.

Because we had time to plan a larger excavation for the summer, and it was clear that there were many bone elements preserved, I wanted to be sure to map the site in detail, both for its paleontological resources, but also for other physical characteristics. So, I arranged to have a surveying total station on hand for the dig. We also lined up numerous volunteers, arranged a university class to be taught using the site as a learning tool, and obtained numerous donations from the generous community of Pratt. The entire community got behind the excitement of the dig, and because the site was easily accessible being at the airport, we hosted numerous visitors.

Establishment of points within the site

During the November, 1999 dig, I had established three control monuments at the site. The monuments were a hub (2 inch x 2 inch stake) and tack (a special surveying nail) driven into the ground away from the areas we were going to be disturbing in our excavations. This insured that we could re-find the control monuments and they would be used to relate all the points of the excavation to each other within the dig area.

Using the control monuments, we established an arbitrarily-oriented meter grid system. I was not concerned with the cardinal orientation of the grid so much as wanting the grid to be useful for in-site control of the dig. One of the principle uses of the grid was to demarcate 2 x 2 meter spaces to assign to volunteers to control their digging efforts. Having the grid on the ground helped to keep their efforts orderly, as they could be assigned to “dig here” and not be on top of each other. The use of the surveying total station allowed for accurate layout of the grid system across the entire site, and allowed for unlimited expansion of the system as needed.
 
The reason that the grid was redundant for the within-site location of bones is that all bones were located with the total station using standard radial surveying techniques. Every element removed from the site was given a field number, and the location of the element was documented in three-dimensions. Initially, the grid system was assigned assumed x and y coordinates in meters, and an assumed elevation was assigned to the control monuments so that the z dimension could be calculated relative to other points in the site.

The total station is set up over a point and aliened with another control point to get a starting line. The instrument can accurately measure distances by shooting a laser to a reflecting prism and measuring the time it takes to return to the instrument. It also accurately measures horizontal and vertical angles. With the vertical angle and the distance, it can calculate the difference in height (z) between the reflector and the instrument. So, with relatively simple calculations the x, y, and z coordinates of any point within the site can be determined. The instrument is highly accurate (within 1/1000’s of a meter in distance) so within-site accuracy is estimated to be high, likely within a centimeter or two given the reliability of using inexperienced volunteers to help with the surveying.
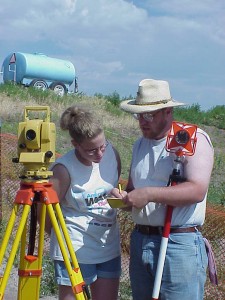
Teaching a young volunteer to use the total station surveying instrument.

Teaching a young volunteer to use the total station surveying instrument.

Most of the elements removed from the site were located with a minimum of two points. The smallest bone fragments were located with point locations of a single measurement. If they bone had any linearity to it, it was located as two points (end and end) giving both the approximate length of the bone and its linear orientation. Several of the larger bones were located with three or more points.

All of the points located at the site are described as their three dimensional coordinates, and therefore can be plotted for visualization.
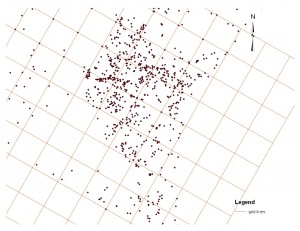
Point cloud from the Pratt Mammoth site shown in map view with the meter grid.

Point cloud from the Pratt Mammoth site shown in map view with the meter grid.

View the point cloud in a short animation.

Translation and rotation to real-world coordinate systems

During the excavation we used assumed coordinates and elevations. However, it is desirable to be able to locate the site, and all the points located within the site, in a real-world coordinate system so that it can be related to other localities anywhere in the world. We did not have high-precision global positioning system (GPS) equipment available, although such equipment does exist. However, using the following method we were able to get very effective results using a basic Garmin handheld GPS unit.

The accuracy of the handheld unit varies with availability of satellites, access to the open sky, variations in atmospheric conditions, basic limitations of the unit itself, and other variables. However, it is possible to locate a point on the globe to within approximately 15 feet or so. I used the GPS to record the location of two of my control monuments. I used the coordinates of the GPS reading to calculate the azimuth between the control monuments, and assumed that was the true azimuth. I knew the distance between the monuments based upon my field survey of measuring between them. I assumed the GPS reading on one of the control monuments to be true and “held” its coordinates to that reading. Using the azimuth to the other monument from the GPS reading, and the distance measured in the field, I then calculated the new coordinates for the second control monument.

With the assumption of the coordinates of the first monument, the accurate real-world azimuth, and the measured distance to the second control monument providing its coordinates, it was possible to recalculate the coordinates of every point within the dig site. It is a basic mathematic routine to translate (move points horizontally in space) and rotate (turn the points on an axis in space) all the points located at the dig site to a very close approximation of their real-world coordinates. Since we measured all the points in meters I used the Universe Transverse Mercator (UTM) coordinate system. I estimate that the accuracy of these coordinates should be within about 15 feet (the error of the reading on the handheld GPS). This is not as accurate as you could get with high-precision equipment, but it is accurate enough for almost all purposes, and can be achieved with inexpensive equipment that is readily available.

I have modified the system somewhat, but I have since used this basic system at other excavation sites with very good results. The real-world coordinates of every point from the site allows very accurate plotting of fossil sites, and even individual bone elements, in relation to other sites. It also allows for the application of geographic information systems (GIS) technology on the sites.
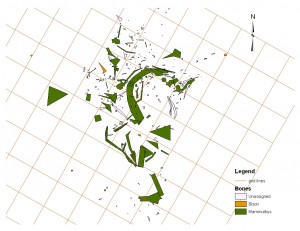
Bones drawn using the points located at the Pratt Mammoth site.

Bones drawn using the points located at the Pratt Mammoth site.

Personal GPS tracking

In exploring handheld GPS units I came across something that was really interesting and has a lot of fun promise. It is the SPOT Personal Tracker.

The Personal Tracker is a device that you can carry with you while traveling on remote, or not so remote, adventures. It uses the same GPS satellite systems that other GPS receivers do, which means that it will work globally, and in places where cell phone coverage is limited or non-existent. The devise promises several nifty features that could be very handy and fun.

For example, you can set the unit to track your progress every 10 minutes and send a message back to friends and family to let them know your location. You can even allows people to follow your progress on a website—a fun way to share someone’s adventure with them. I can see those intrepid individuals who climb mountains or sail solo across the ocean, or even something less grand like driving across the country, making use of this for family.

You can have the unit send an “all OK” message to a list of people to give them periodic evidence that you have not fallen off a cliff. And in the case of a real emergency it has a 911 button which transmits your location to rescue operations and lets them know you need immediate help.

These all sound like great features, especially when the unit costs only about $100. However, in reading reviews and exploring the SPOT website, it may be an idea whose time has not quite come.

Reviews of the device are mixed, with more positive reviews than negative to be sure, but the negative reviews are consistent in topic. Mostly the complaints are that the unit does not obtain satellite lock as well as regular handheld GPS units, so in places with forest cover or in canyons that have limited access to the sky, the unit may not be able to transmit the location. This might not be so bad if it lost connection periodically, but seems to be a consistent issue.

The second issue that negative reviewers mention is that the website interface that SPOT provides is often, well, “spotty.” In order to use the device you must pay a subscription fee (basic fee looks to be about $100/year, with additional options available). And there are many complaints about the unit not being able to correctly contact the web system to update it. For example, if you arrange to send an “OK” message everyday at a certain time as a check in, the system might well not register it, leaving those tracking you wondering if it was a system error or something more serious.

Out of curiosity I visited the SPOT webpage to look it over, and I must say I was not impressed with what I saw. For a company offering a “high-tech” service, I could not get the webpage to function correctly. It may just be my browser, but the pull-down menu items flashed on and off and I could not navigate—it did not inspire me with confidence.

So, I guess I have to agree with the reviewers that this unit might be fun to play with, and it has great promise, but it might not be something to risk your life with. Although if this brand does not fully meet expectations I bet one will sometime soon—it is a great idea. If you know of other brands out there let me know and we can look into them.

UTM

In a couple of previous posts we have examined latitude and longitude in some detail, and explored in what format the numbers might be displayed on your handheld GPS unit. Here we will explore another commonly used coordinate system: UTM.

Latitude and longitude work well, but since they are all based upon circles, and because degrees are divided into groups of 60, the calculations required to work with them are unwieldy. It is frequently useful to have coordinates based upon plane rectangular geometry in our normal base 10 system. This can work well if the area in question is not too large, because then we can discount the curvature of the Earth. Over just a section of the Earth, the curve does not make a huge difference in error.

In order to do this, we must “flatten” the Earth to a plane, and when we do we can use the Cartesian coordinates that we all used in high school geometry class. It would be like flattening the peel of an orange. If you try to flatten the whole peel it makes a very irregular shape. But if you flatten a small piece it does fine. Then you can think of the x and y axes as east-west and north-south.

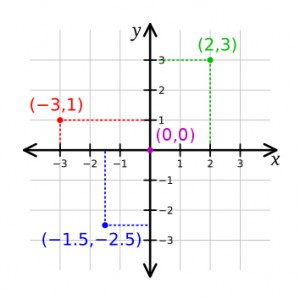
Cartesian coordinate system illustrated

The familiar Cartesian coordinate system showing how points can be assigned a distance along two axes from the origin point.

As you recall, every point on this plane can be described by two coordinates, one along each axis. And you can see in the  illustration that some of the points have negative values with respect to the origin (point 0,0). However, we can control how we place the coordinate system, and with the origin point outside of our area of interest all the points can be positive (east, north)—in the upper right-hand quadrant.

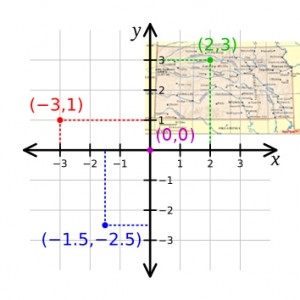
State of Kansas laid on top of a Cartesian coordinate form

The State of Kansas placed on the rectangular grid so that every point in the state will be positive with regard to the origin.

UTM coordinates, or Universal Transverse Mercator coordinates, are a rectangular plane system in metric units. Cartographers have taken swaths of each state and mathematically flattened them into a plane, assigned an origin southwest of each section, and laid out the resulting grid. Some of the smaller states are covered in a single swath, but the larger states must be broken into several zones so that the curvature of the Earth does not distort each map too much.

So, UTM coordinates have two components: their easting and northing values from the origin point in meters, and which state zone you are referring to. You can see a map of the zones here.

I have used UTM coordinates to good effect in my scientific work. When mapping a paleontological excavation, for example, we make all measurements in metric units. Since we are already measuring in metric units, every point in the dig site can easily be assigned its real-world UTM coordinate, instantly relating all points in the dig to any other point on the globe.

This means we can accurately and quickly plot the location of any fossil site, or even individual fossils, on a real-world map.

Related posts:
Recommended handheld GPS units
handheld GPS basics
Basic features in a handheld GPS
Geocaching

Mapping the Pratt Mammoth

Latitude and longitude 2

In the first discussion of latitude and longitude, we investigated how the latitude-longitude grid was established. In this post we will look at how that relates to the display on your handheld GPS unit.

If I stand outside with my GPS and direct the unit to display my position, it may do so in a couple of different ways. First, it might show my position on a map background, pinpointing my location with regard to other features such as streets, buildings, or landforms. This shows me my location as if I were walking around on the map.

I might want to know my latitude and longitude coordinates. Perhaps I want to record them so I can return to this spot in the future. (You can understand why a “bone digger” would want that!) In most handheld GPS units you can save your location as a waypoint. (See my review of the best GPS units.)

A really useful thing to be aware of about has to do with the format of latitude and longitude number displays. These numbers can be expressed in several ways, and you must know which format the numbers are in or risk making errors. After GPS units first came out, I used one to locate some fossil sites where I collected. I happily recorded the coordinates for the fossils I picked up, and dutifully wrote them in my field book. Only later did I realize that I was not perfectly clear which form the coordinates were in, making the records almost useless!

Most handheld GPS units allow you to display the coordinates in several formats. You could show the form degrees-minutes-seconds, sometimes denoted as DMS. This might look something like 38°53’22.49″N, 99°17’58.73″W. Latitude is given as degrees north or south from the equator, and longitude is given as degrees east or west from the prime meridian.

But we could also give these same numbers in another format which would look like: 38° 53.375’N, 99° 17.979’W. This format is in the form of degrees, minutes, and decimal minutes, or DMM.

Finally, we could show these coordinates as full decimal degrees (DDD) and it would look like: 38.889583°, -99.299650°. Note that in this form, the positive or negative form of the number is important as that gives the direction. Positive latitude numbers are north, and negative longitude numbers are west.

Notice that these forms are all equal: 1° 30′ 30″ (DMS); 1° 30.5′ (DMM); 1.5083° (DDD). And you can see if you just wrote down numbers on a page, and were not very clear about which form the numbers were in, you could be very far off the mark in terms of location.

There is another common coordinate form called UTM which we will examine in another post. Bonus points to anyone who can tell me what is at the coordinates used in this post.