Category Archives: Equipment

Knives For Hunting Also Have Many Other Uses

If you are gathering together the things you will need for an extended journey into the great out of doors, then any experienced outdoorsman will tell you that proper knives for hunting are essential. This is because having a quality knife near at hand will be very useful during your journey and not just for the obvious uses of cleaning and skinning any of the game you successfully bag. A good knife will also be very handy if you encounter a wild animal that might attack or for trimming branches in order to set up camp.

As with any other type of instrument for cutting, hunting and fishing knives must be well cared for and maintained in order to extend their life and to make them as useful as possible. When one is out on a hunting, fishing or camping expedition, it is important to be sure that the fixed blade hunting knives or folding hunting knives that you take along are ready at a moments notice to do their job. This means they should be clean and recently sharpened. In the instance of folding or pocket knives, they should be oiled so that the blade can be accessed easily and quickly.

For those who use their knives for hunting on a daily basis for other purposes, it is a good idea to clean the knife daily or after every use. This helps to keep not only the blade in the best condition possible, but the entire knife as well. If the hunting knife is properly cleaned, then you can see if there are any nicks or damages to the blade.

If you do see that the blade has been nicked, it is important to hone out that area as quickly as possible, and most certainly before using the blade again. This will keep the blade from becoming even more damaged and will also assure that you always have the sharpest cutting edge on your knife at all times. A dull blade can be dangerous to the user, as more pressure is required and in such circumstances the blade is more likely to slip and cause an injury to the user.

Hunt and fish knives typically end up being used to skin, gut and clean animals and fish that has been killed or caught, and as a result they can become very dirty, very quickly. Out in the wild it is not always possible to thoroughly clean a knife that has just been used, but at the very least the blade and handle should be wiped down to remove as much blood and tissue as possible.

Upon returning to camp, it is best to completely wash the knife with soap and water to rid it of any residue and dirt left on the blade and handle. There are also a number of cleaning solutions on the market which can be very useful in keeping the knives for hunting in good condition and which can easily be taken along on your next hunting trip. Visit www.lightsandknives.com/hunting_knife_sharpening.htm for tips on how to maintain your knives in good condition.

Want to find out more about knives, then visit Tim Frazier’s site on how to choose the best folding knives for your needs.
Also see what you should look for in a hunting knife.

Give Yourself An Edge With This Carp Fishing Gear

Guest Post

When it comes to fishing, the biggest draw to freshwater fishing right now has to be carp fishing. This is the same throughout America as much as Europe. People just can’t seem to get enough. There might not be a considerable difference between fishing for carp over fishing (rod and reel) for anything else, but there are some differences to be presented. One of which is carp fishing gear. If you are serious about catching carp, you ought to educate yourself on the necessities.

When you think about carp fishing gear, you should be thinking a few things specifically. These being: the rods, bait, and line.

Getting a rod to specifically go carp fishing is a possibility for the serious carp angler. The difference in these rod and reels over the competition of other fishing types is generally the length of the rod. Carp rods get to be about 12′ long and with very good reason. If you are pulling in a 45 lb. Monster carp, you don’t want to lose your rod to the tension and pull of the fish. A longer rod simply gives you more leverage. They start around $25 for a low-end rod, but the best rods will run you around $150. The difference is the makeup of materials, which greatly affects the rods endurance and overall durability in clutch situations.

Perhaps the most important part of fishing for carp exclusively is getting bait that carp exclusively enjoy. Granted, this is not to say that some other fish isn’t going to be enticed by what you have dangling in the water, but you will land more carp by getting the right baits. Some of the companies that make some great bait to land big carp are K-1 and Kryston. They both claim to have some great concoctions of proteins and enticing elements that carp simply cannot ignore.

Getting appropriate line is pretty crucial to your cause as well. If you have insufficient line, then you might not have the carp either. Some carp can get over 50 pounds, and so you have to have a line that can withstand the thrashing and evasiveness of a 50 pound fish. Most often carp range in the 10-20 pound range, yet you don’t want to plan for this being your maximum. Planning ahead can be the difference between the big carp and the big story about the big carp.

The most important aspect of carp fishing is technique and practice. No amount of great gear will live up to real experience and knowledge. Raw skill comes from practice, and no carp can resist the bait of an angler like that.

So if you are confident in your abilities and just want to get an edge, you should definitely check out some of this incredible carp fishing gear.

If you would like to know more about used cheap carp fishing gear, please feel free to visit that page or have a look at this carp fishing blog.

Pocket knife introduction

When I was growing up I was rarely without my pocket knife. I carried it everywhere, even to school, and never thought twice about it because it was such a basic tool to have available. Of course, today, I would guess that schools take a dim view to kids carrying pocket knives, and do not even think of carrying one through the airport security check. It is unfortunate that such a useful tool is getting left out of people’s lives more often these days.

Because of this perhaps, I find fewer people with experience in using and selecting good pocket knives. The choices are overwhelming: there are so many kinds of blades and gizmos you can get; so many gimmicky kinds of things; and so many down-right impractical bits of advice. As I read around the web in preparation for writing this article I saw some bits of “wisdom” that really made me wonder. Some people suggested you might want your pocket knife to cut wire, or hack up tree limbs that fell in your back yard(!), neither of which I would recommend to say the least.

There are many uses for a good knife and thinking about how you are likely to use it will be a good indication of what to look for. Most everyday uses fall into the light-duty category, cutting tape on boxes, opening those ridiculously hard-to-open plastic product packages, cutting string, etc. Everyone should have a good general-use pocket knife for these uses. Many women carry them in their handbags; men often carry them in a pants pocket.

For almost all these uses you will not need a blade longer than about 2 inches. A 4 inch pocket knife is about the largest you would want to carry in my experience. Please avoid the “Rambo” temptation to get a large, nasty looking knife simply for the macho factor. That might be cool when you are 12, but most of those knives end up too heavy to carry and too big to be really useful in everyday life.

I have several knives that I routinely carry depending up my mood. The one I carry most I have clipped to my keys. It fits easily into my pocket and has a very effective blade of just 1.5 inches. This knife, made by Kershaw, has two blades. The main blade folds out like a typical knife—the second folds out with the sharp edge toward the first, turning both blades into a handy scissors. This little knife has kept its edge very sharp through lots of use, and I highly recommend it for most basic needs.

UTM

In a couple of previous posts we have examined latitude and longitude in some detail, and explored in what format the numbers might be displayed on your handheld GPS unit. Here we will explore another commonly used coordinate system: UTM.

Latitude and longitude work well, but since they are all based upon circles, and because degrees are divided into groups of 60, the calculations required to work with them are unwieldy. It is frequently useful to have coordinates based upon plane rectangular geometry in our normal base 10 system. This can work well if the area in question is not too large, because then we can discount the curvature of the Earth. Over just a section of the Earth, the curve does not make a huge difference in error.

In order to do this, we must “flatten” the Earth to a plane, and when we do we can use the Cartesian coordinates that we all used in high school geometry class. It would be like flattening the peel of an orange. If you try to flatten the whole peel it makes a very irregular shape. But if you flatten a small piece it does fine. Then you can think of the x and y axes as east-west and north-south.

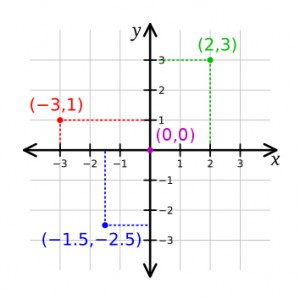
Cartesian coordinate system illustrated

The familiar Cartesian coordinate system showing how points can be assigned a distance along two axes from the origin point.

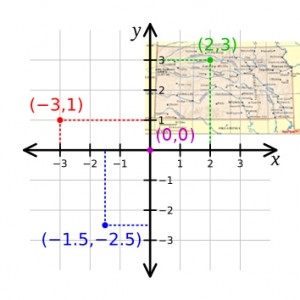
As you recall, every point on this plane can be described by two coordinates, one along each axis. And you can see in the  illustration that some of the points have negative values with respect to the origin (point 0,0). However, we can control how we place the coordinate system, and with the origin point outside of our area of interest all the points can be positive (east, north)—in the upper right-hand quadrant.

State of Kansas laid on top of a Cartesian coordinate form

The State of Kansas placed on the rectangular grid so that every point in the state will be positive with regard to the origin.

UTM coordinates, or Universal Transverse Mercator coordinates, are a rectangular plane system in metric units. Cartographers have taken swaths of each state and mathematically flattened them into a plane, assigned an origin southwest of each section, and laid out the resulting grid. Some of the smaller states are covered in a single swath, but the larger states must be broken into several zones so that the curvature of the Earth does not distort each map too much.

So, UTM coordinates have two components: their easting and northing values from the origin point in meters, and which state zone you are referring to. You can see a map of the zones here.

I have used UTM coordinates to good effect in my scientific work. When mapping a paleontological excavation, for example, we make all measurements in metric units. Since we are already measuring in metric units, every point in the dig site can easily be assigned its real-world UTM coordinate, instantly relating all points in the dig to any other point on the globe.

This means we can accurately and quickly plot the location of any fossil site, or even individual fossils, on a real-world map.

Related posts:
Recommended handheld GPS units
handheld GPS basics
Basic features in a handheld GPS
Geocaching

Mapping the Pratt Mammoth

Latitude and longitude 2

In the first discussion of latitude and longitude, we investigated how the latitude-longitude grid was established. In this post we will look at how that relates to the display on your handheld GPS unit.

If I stand outside with my GPS and direct the unit to display my position, it may do so in a couple of different ways. First, it might show my position on a map background, pinpointing my location with regard to other features such as streets, buildings, or landforms. This shows me my location as if I were walking around on the map.

I might want to know my latitude and longitude coordinates. Perhaps I want to record them so I can return to this spot in the future. (You can understand why a “bone digger” would want that!) In most handheld GPS units you can save your location as a waypoint. (See my review of the best GPS units.)

A really useful thing to be aware of about has to do with the format of latitude and longitude number displays. These numbers can be expressed in several ways, and you must know which format the numbers are in or risk making errors. After GPS units first came out, I used one to locate some fossil sites where I collected. I happily recorded the coordinates for the fossils I picked up, and dutifully wrote them in my field book. Only later did I realize that I was not perfectly clear which form the coordinates were in, making the records almost useless!

Most handheld GPS units allow you to display the coordinates in several formats. You could show the form degrees-minutes-seconds, sometimes denoted as DMS. This might look something like 38°53’22.49″N, 99°17’58.73″W. Latitude is given as degrees north or south from the equator, and longitude is given as degrees east or west from the prime meridian.

But we could also give these same numbers in another format which would look like: 38° 53.375’N, 99° 17.979’W. This format is in the form of degrees, minutes, and decimal minutes, or DMM.

Finally, we could show these coordinates as full decimal degrees (DDD) and it would look like: 38.889583°, -99.299650°. Note that in this form, the positive or negative form of the number is important as that gives the direction. Positive latitude numbers are north, and negative longitude numbers are west.

Notice that these forms are all equal: 1° 30′ 30″ (DMS); 1° 30.5′ (DMM); 1.5083° (DDD). And you can see if you just wrote down numbers on a page, and were not very clear about which form the numbers were in, you could be very far off the mark in terms of location.

There is another common coordinate form called UTM which we will examine in another post. Bonus points to anyone who can tell me what is at the coordinates used in this post.